
Problem focused eye exam
Shu Feng, MD
For patients with a vision concern, a complete exam would include:
- Testing visual acuity
- Assessing visual fields
- Inspection of the external eye
- Assessment of corneal light reflex and extraocular movements
- Assessment of pupillary symmetry and assessment reactivity
- Inspection of cornea and iris
- Fundoscopy
Step 1. Measure visual acuity in each eye
Normal visual acuity is 20/20, meaning your patient can read print at 20 feet that someone with normal vision can read at 20 feet. As visual acuity decreases, the denominator goes up – Visual acuity of 20/80 indicates that a patient can recognize at 20 feet a symbol that a person with normal acuity can recognize at 80 ft.
The best measure of acuity is distance visual acuity, which is typically tested at 20 feet. Test one eye at a time, occluding the other eye with an opaque occluder or the palm of your hand. Have the patient wear their own distance correction (glasses or contacts) if possible. Ask the patient to read the smallest line in which he or she can distinguish at least half of the letters. Record the acuity measurement as a notation (eg 20/20) in which the numerator represents the distance at which the test is performed, and the denominator represents the numeric designation of the line read. Repeat for each eye individually.
If the visual acuity is 20/40 or worse in either eye, repeat the test with the patient viewing the test chart through a pinhole occluder, as this can help identify if there is a problem with refractive error (needing glasses) or a surface or lens problem.
If the patient cannot see the largest Snellen letters:
- Move the patient closer to the chart and record the new distance as the numerator of the acuity designation (eg 5/200 if the patient is 5 ft from the chart and is only able to read the 20/200 size letters).
- If they are unable to see the largest Snellen letter at 3 feet, hold up 1 hand, extend 2 or more fingers and ask the patient to count the number of fingers, recording the distance at which counting fingers is done accurately (eg, CF 1ft).
- If the patient cannot count fingers, determine whether they can correctly determine the direction of hand motion (eg HM 2ft).
- If the patient cannot detect hand motion, use a bright light to determine whether they can detect the direction or perception of light. Use a bright light in a dim room, and ask the patient: “let me know when you see the light on,” and “let me know when the light disappears”, determining whether they are LP (light perception) or NLP (no light perception).
Near visual acuity testing is performed if a patient has a complaint about near vision or if distance testing is difficult, such as at bedside. Use a patient’s reading glasses if they use those for reading. Hold a pocket vision screener or smartphone app the indicated distance away from your patient. Ask them to cover one eye and read the lowest line they can with the tested eye, then switch eyes and repeat.
Step 2. Perform a confrontation visual field test for each eye
This test grossly examines for visual field deficits. Place yourself approximately 1 meter away from the patient. Ask the patient to cover the left eye while covering your right eye in order to use your own left eye as a reference in assessing the patient’s field of view. Ask your patient to look at your uncovered left eye and count your fingers in each of the 4 quadrants of the visual field. Use 1, 2, or 5 fingers in this test. Wiggling the fingers may be less sensitive. Repeat the procedure with the patient’s left eye.
Step 3. Inspect the eyelids, surrounding tissues, conjunctival and sclera
Carefully observe eyelids, lashes, bulbar & palpebral conjunctiva, sclera, cornea, anterior chamber, and iris. Inspection of the conjunctival and sclera is facilitated by using a penlight and having the patient look up while retracting the lower eyelid or look down raising the upper eyelid. Palpation of the orbital rim and eyelids if there is concern for trauma or mass lesion.
Upper eyelid eversion is sometimes required to search for conjunctival foreign bodies. Ask the patient to look down and grasp the eyelashes of the upper eyelid between the thumb and index finger. Use a cotton tipped applicator to press gently downward over the superior aspect of the tarsal plate as you pull the eyelid margin upward by the lashes.
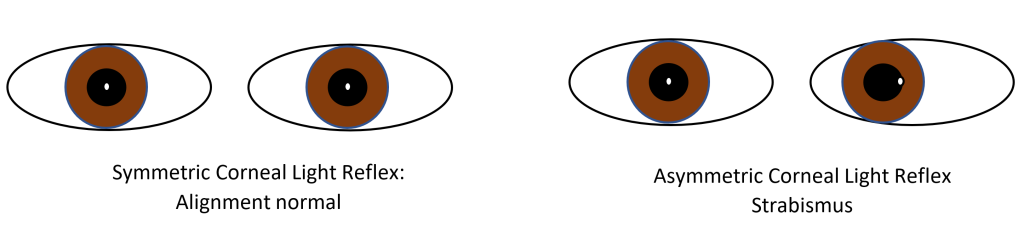
Step 4. Observe the corneal light reflex and extraocular movements
Hold your penlight directly in front of your patient, about 12 inches away. The light should appear in the same spot in both eyes, indicating that they are normally aligned. An asymmetric corneal light reflex indicates that your patient has strabismus, which can cause long term vision problems in children.
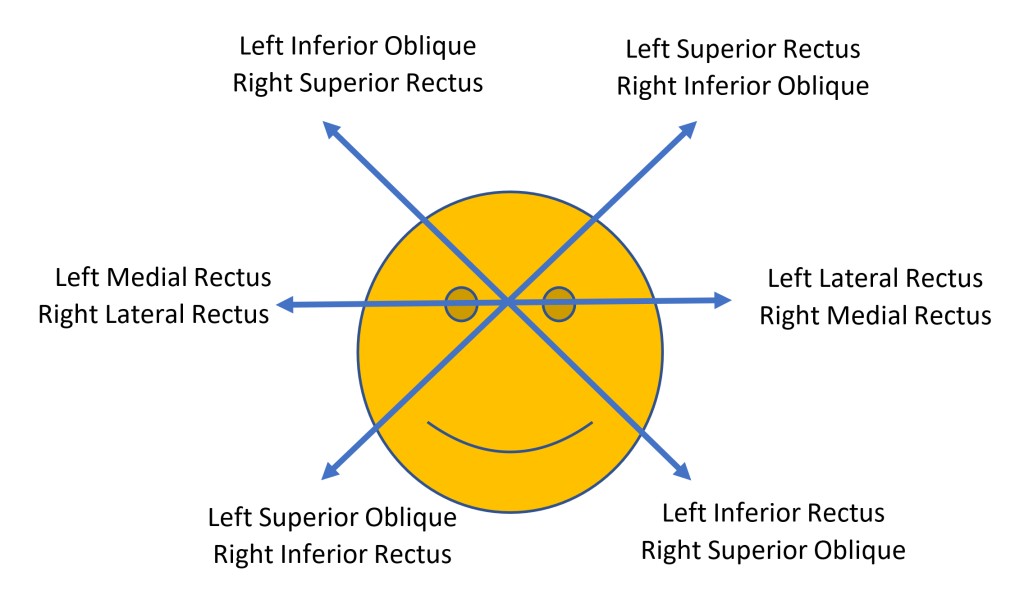
To test ocular motility, ask the patient to follow an object or your finger in 6 directions, the cardinal fields of gaze. You can have them follow your finger in the “H” pattern. This enables you to systematically test each muscle in its primary field of action.
Step 5. Assess pupil symmetry & reactivity
Observe the size and shape of the pupils in ambient room light. Anisocoria of < 1 mm is common (up to 20% of the population) and is considered normal if the pupils react to light similarly. For differences >1mm, the difference in pupil size should be recorded both in very bright and very dim lighting.
Assess the reactivity of the pupils by observing pupillary constriction with direct and consensual light. Keep the room illumination dim and have the patient look at a distant object. Direct the penlight at the patient’s right eye to see if the pupil constricts. Repeat for the left. To test for consensual pupillary reaction, direct the penlight at the right eye and watch the left pupil to see if it constricts with the right pupil. Repeat the same for the left pupil while watching the right.
Conduct a swinging flashlight test to detect a relative afferent pupillary defect (RAPD), which is present when there is a difference in the strength of the pupillary reflex between the two eyes. Perform the test for the pupillary light reflex, except that the light is rhythmically swung between the 2 eyes to compare the intensity of the light reflex. The light must be shone into each eye for equal amounts of time and from the same angle, typically for 3 seconds each eye, repeated several times. The pupils should remain the same size or constrict slightly as the light is swung between the two eyes. A RAPD is present when there is repeatable dilation of both pupils without initial constriction as the light is swung from the normal eye to the abnormal eye. A RAPD indicates a lesion in the optic nerve or retina on the affected side. A RAPD never causes anisocoria and cannot be bilateral.
Step 6. Inspect the cornea and iris. Assess the anterior chamber for depth and clarity.
Use a penlight to illuminate the cornea and observe for any opacities. If a patient complains of eye pain or foreign body sensation, use fluorescein staining to diagnose defects of the cornea. Fluorescein is applied by moistening a sterile filter paper strip with a drop of sterile saline, water, or topical anesthetic and touching it to the palpebral conjunctiva. Viewing the eye under cobalt blue light or using a Wood lamp enhances the visibility of the fluorescence.
The anterior chamber is typically deep and the iris has a flat contour. The anterior chamber should be clear, such that iris details can be seen. Note if there is blood (hyphema) or purulence (hypopyon) in the anterior chamber. If the iris appears to be bowed forward, the chamber may be shallow, indicating narrow angle glaucoma.
Step 7. Perform fundoscopy
The ophthalmoscope allows you to view the interior structures of the eye: the retina, retinal vessels, macula and optic disc, also called the fundus. In Immersion, you will only be expected to be able to demonstrate the red reflex (steps 1-3). Adequate ophthalmoscopy typically requires dilation of a patient’s pupils.
- Position your patient so that your eyes are at the same level.
- Have the patient gaze at a distant object in a darkened room.
- Starting with a 0 lens, set the aperture wheel to select the large, white light. Focus on the lashes from 12 inches away, and look for the red reflex. The red reflex should be symmetric and evenly colored without shadows, indicating that light is reflecting equally off of each retina.
- Hold the ophthalmoscope in the R hand and use your R eye to examine the patient’s R eye. Switch hands/eyes to examine the patient’s L eye.
- Moving in at an angle of 15 degrees lateral to the patient’s line of vision, focus on the retina by rotating the lenses until the retinal vessels are clearly visible. Follow the vessels until you see the optic disc. Carefully examine as much of the retina as you can.