
Knee Exam (Benchmark)
Benchmarks for a problem focused exam of a patient with knee pain include:
Inspection
- Inspect the knees in the standing position, observing alignment and leg length
- Observe gait
- Inspect the knees in the seated or supine position, observing for deformity, swelling, erythema, and ecchymoses
Palpation
- Palpate systematically, noting warmth, deformity, swelling and tenderness:
- Patella, quadriceps tendon and prepatellar bursa
- Proximal tibia
- Proximal fibula
- Medial & lateral femoral epicondyles
- Popliteal fossa
- Medial and lateral joint lines
Range of motion
- Extension
- Flexion
Strength testing
- Knee extension
- Knee flexion
Stability and special tests:
- Test medial and lateral collateral ligament (MCL and LCL) stability with varus and valgus stress
- Test anterior cruciate ligament (ACL) stability with
- Anterior drawer test OR
- Lachman Test
- Test posterior cruciate ligament (PCL) stability with posterior drawer test
- Test for meniscal injury with McMurray’s test
- Evaluate for knee effusion if indicated by history and exam.
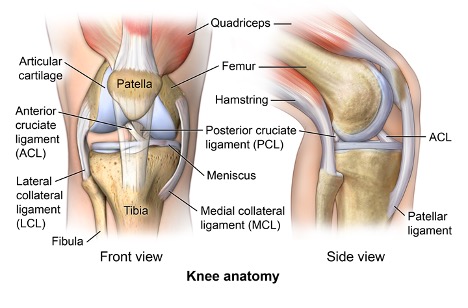
Key landmarks & structures
Identify each of the following anatomic landmarks, which will guide your exam and your documentation.
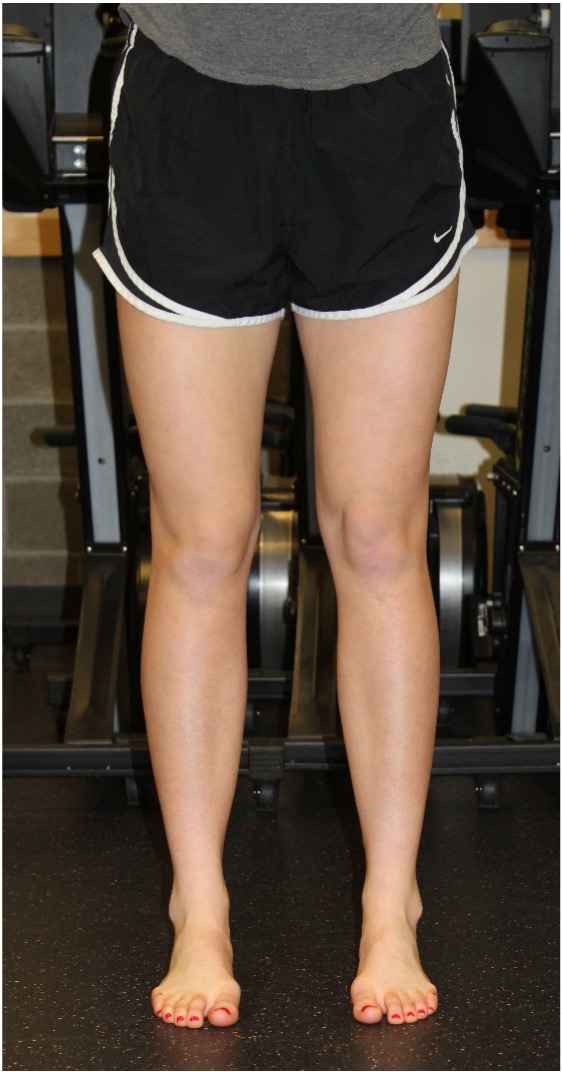
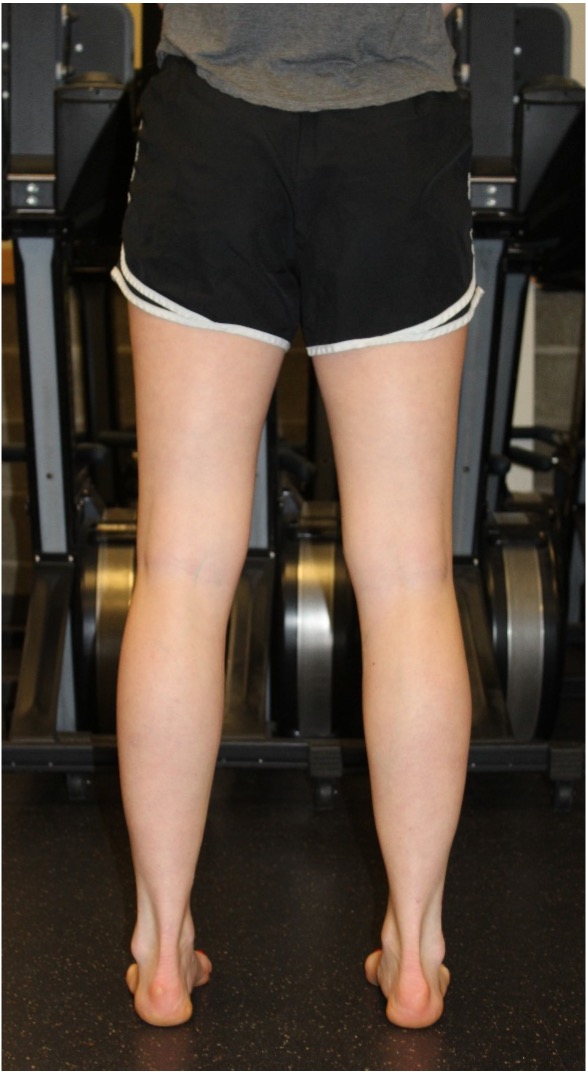
Inspection
Inspect the knees in the standing position, first anteriorly and then posteriorly, observing leg length and alignment. Next inspect the knees in the seated or supine position, observing for asymmetry, redness, swelling, bruising or deformity.
Differences in alignment may be described as:
- Varus or genu varum (historically referred to as “bow legs”)
- Valgus or genu valgum (historically referred to as “knock knees”)
 |
 |
 |
Palpation
Systematically palpate the structures of the knee, comparing one side to the other. Carefully note any warmth, deformity, swelling or tenderness and attempt to identify any structures that are tender.
- Patella, quadriceps tendon and prepatellar bursa
- Proximal tibia (including tibial plateau area, patellar tendon, tibial tuberosity and Gerdy’s tubercle)
- Proximal fibula (including head and neck)
- Medial & lateral femoral epicondyles
- Popliteal fossa
- Joint Line: medial & lateral
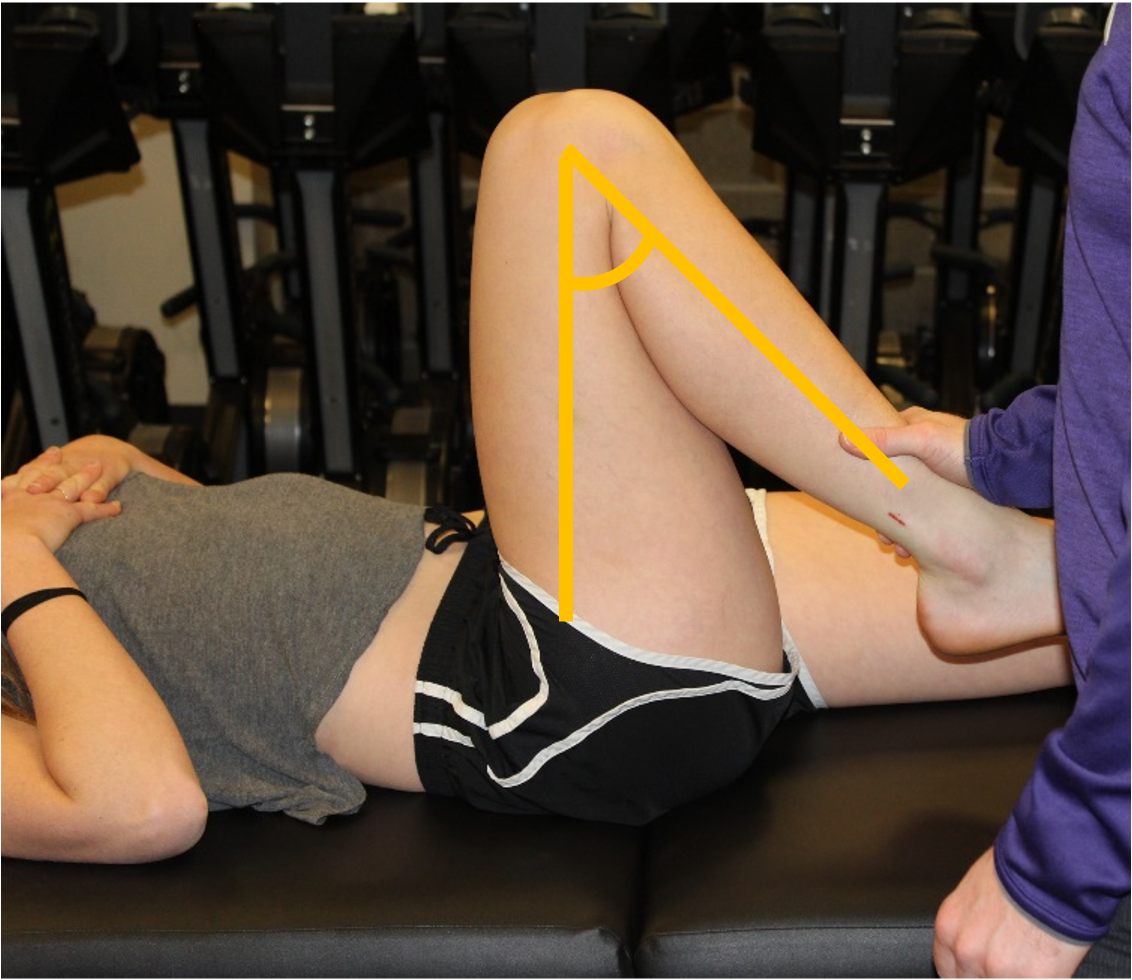
Range of Motion
Evaluate active and passive range of motion, comparing the affected to the unaffected knee. If range of motion is limited note the following:
- Is motion limited by pain or “true” restriction?
- Is the end point “soft” or “firm”?
 |
 |
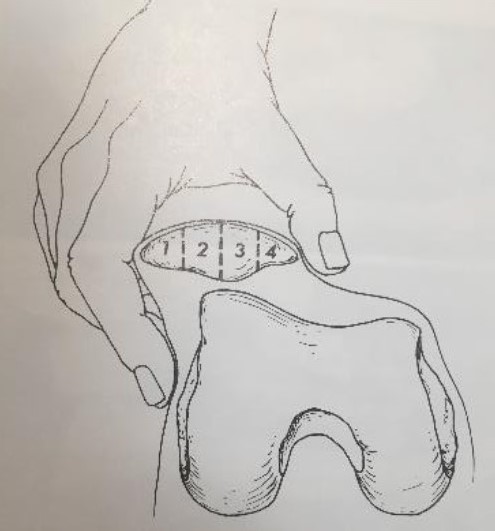
Motion of the patellofemoral joint should also be assessed. This is done passively primarily through medial and lateral motion of the patella.
Make not of the following:
- Amount of motion (see quadrants in image), including restriction of motion. 1-2 quadrants is considered normal.
- Pain
- Apprehension sign (sign of prior dislocation/subluxation of the patella)
strength testing
With the patient in the seated position, test knee extension and flexion.
Strength testing can also help differentiate some causes of knee pain.
- Hip flexion can help to distinguish between quadriceps muscles that may be causing pain. Only the rectus femoris crosses both the knee and the hip – pain with hip flexion suggests that it may be causing knee pain.
- Hip adduction can bring out pain localized to the pes anserine.
- The Squat Test, where you ask patients to squat with the goal of reaching the “gluts to the floor,” tests flexion of the knee as well as pain with compression of the intra-articular structures such as the meniscus.
Hypothesis Driven Physical Exam
Ligamentous injuries
Most ligamentous injuries of the knee will be related to a traumatic event. They most frequently occur in athletes especially those involved in sports that require sudden changes in direction and speed. Injuries involving the medial collateral ligament (MCL) and the anterior cruciate ligament (ACL) are the most common. Patients may complain of hearing a “pop” at the time of injury, swelling, locking (especially if the meniscus is also injured), giving out of the joint or a sense of knee instability.
- MCL injuries occur when knee is struck from the outside (valgus stress)
- LCL injuries occur when knee is struck from the inside (varus stress)
- ACL injuries can occur from a direct blow causing hyperextension or valgus deformation of the knee or from jumping or changing direction and causing rotation and lateral bending (valgus stress) to the knee.
- PCL injuries are the least common isolated ligament injury. Usually due to high-energy trauma such as motor vehicle accident with posteriorly directed force applied to flexed knee “dashboard injury.” Can also occur in low-energy trauma with direct blow to anterior knee or falling on flexed knee with foot plantar flexed.
- “Terrible triad” involves injury to MCL, ACL and the medial meniscus.
MCL and LCL stability testing
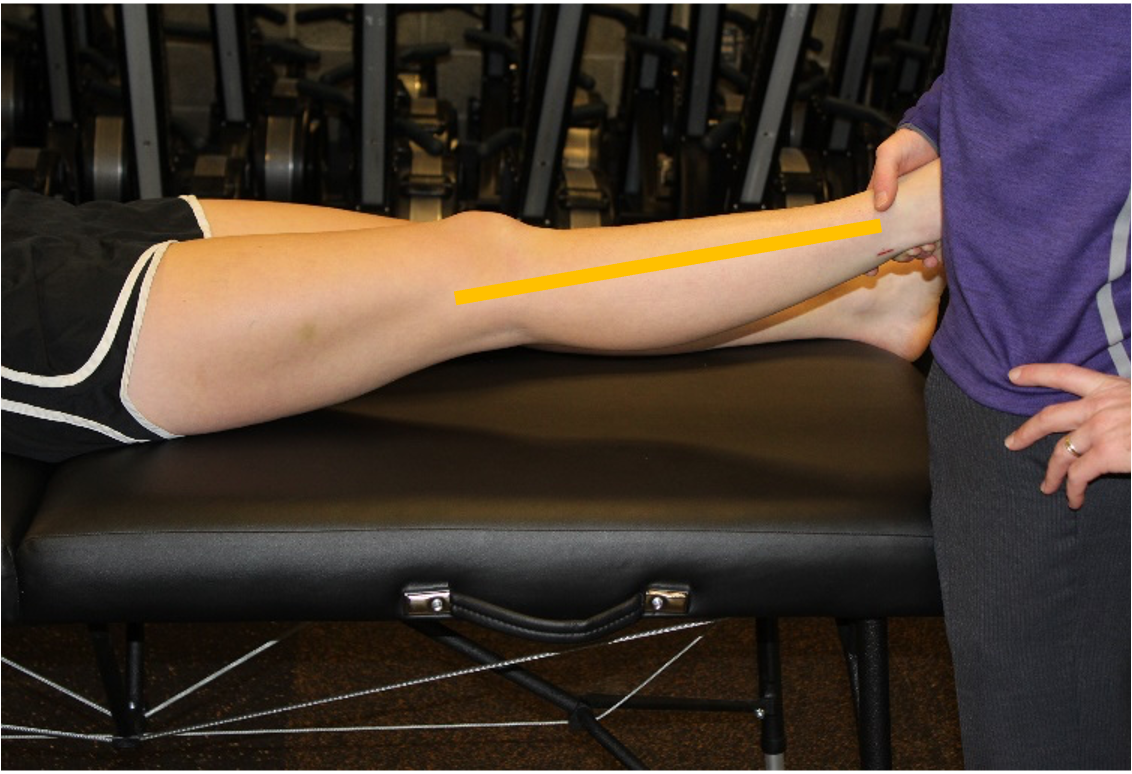
With your patient supine, apply varus and valgus stress to the knee at 0° and 30° of flexion, noting any laxity or pain.
ACL and PCL stability testing
Next assess the stability of the anterior and posterior cruciate ligaments. The two most commonly used tests for the ACL are the anterior drawer and Lachmann’s test. For the PCL, perform the posterior drawer. For each, note the amount of laxity and the presence or absence of a clear ‘endpoint’.
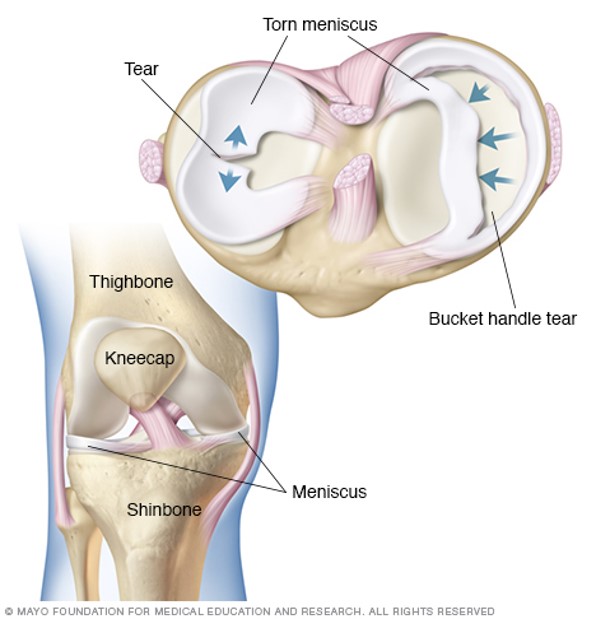
Meniscal injuries
Meniscal injuries are common. Acute meniscal tears usually occur from twisting injuries. Chronic degenerative tears can occur in older individuals with minimal twisting or stress. Meniscal injuries can occur in isolation or in association with collateral or cruciate ligament injuries/tears. Depending on the severity of the injury patients may present differently. Common complaints may include swelling, pain with twisting or pivoting, a sensation of popping, locking (inability to extend the knee fully), catching or the knee “giving out.”
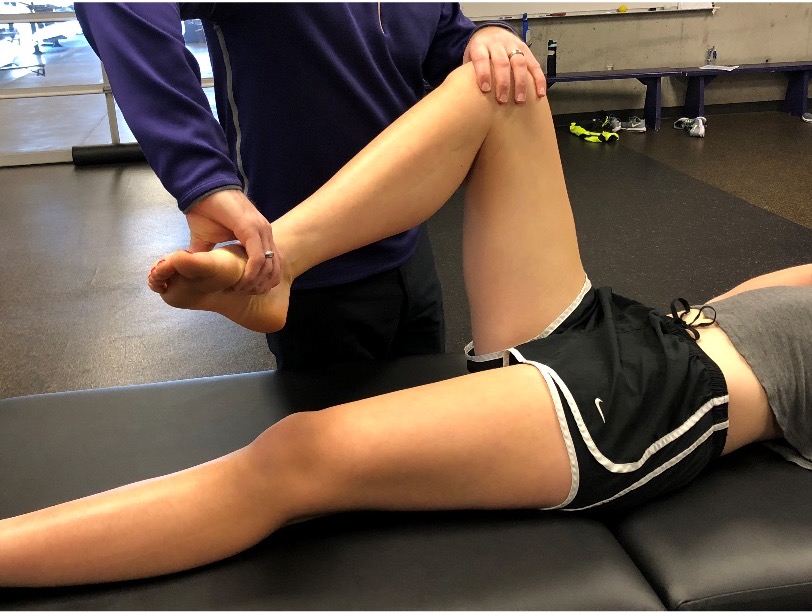
McMurray’s test
 This is a fundamental component of the knee exam, performed to evaluate for tears of the medial and lateral meniscus.
-
Examiner holds foot in one arm/hand. The other hand wraps over anterior knee with thumb and pointer/middle finger over joint lines.
-
Knee is then run through flexion and extension with internal and external rotation of the tibia
-
Positive test is indicated by a palpable clunk. Also note pain as this may indicate a non-displaced meniscal tear
-
Pain and clicking in the patellofemoral joint are common and important to distinguish from the medial and lateral joint lines
 |
 |
 |
Assessment for joint effusions
There are many ways to assess for an effusion in the knee joint. One method is:
- Position the patient supine, with the knee extended.
- Place the thumb and finger of one hand on both sides of the patella.
- With the other hand compress the suprapatellar pouch against the femur, pushing fluid downwards if it is present.
- Feel for fluid with your thumb and finger