
Introduction to the Physical Exam
A century ago, the physical exam was by the gold standard for most diagnoses, but even today the exam is still critical to good patient care. A careful exam guides the appropriate and judicious use of modern tests, technology, and treatments. It connects us to our patients, makes us better diagnosticians, and contributes to the trust so essential to the physician-patient relationship.
A thorough and thoughtful physical exam is a portable, affordable, accessible tool that minimizes harm while improving physician and patient confidence and stewardship of healthcare resources. It is a crucial skill that allows us to evaluate and prioritize diagnostic hypotheses, helping to guide and monitor treatments and further testing. And with proper consent, the power of touch can helps us connect to and heal our patients.
As your colleagues and teachers, we believe that the physical exam:
- Creates opportunities for us to foster meaningful connection, build trust and humanize our care
- Is a valuable mindful practice that encourages healing and equity
- Connects the anatomy and pathophysiology to the human in front of us
- Increases our confidence in the differential diagnosis and fosters our communication with patients
In Immersion, you will begin to master the thorough, head-to-toe exam that might be performed on a new patient. You will revisit the exam alongside the physiology and pathophysiology of each organ system during the Foundations phase. We believe that developing excellent physical exam skills will serve you and your patients well throughout your career and we are committed to building, maintaining, and using these skills for ourselves.
To maintain the rapport and relationship that you built during the interview, stay sensitive to your patient’s comfort as you perform the exam. Our hands may feel cold, some elements of the exam may be uncomfortable or confusing, and the power differential between clinician and patient may discourage people from speaking up. Carefully observe for any signs of discomfort or anxiety and check in frequently with your patient, adjusting your approach as needed.
Learning the values of observation, equity, access, mindfulness and trust through the physical exam.
Privacy and modesty
To maximize privacy, ask if your patient would like others to leave the room during the exam. Closing the privacy curtain around the patient and close the door to the room. For a comprehensive exam, a patient would typically be dressed in a gown. For a more limited exam in the clinic, the exam may be performed around clothing. In either case, it is important to fully expose the area being examined while maintaining your patient’s modesty.
Double draping
Double draping refers to the adjustment of your patient’s gown and a sheet to maintain modesty and maximize comfort throughout the physical exam. Please practice this skill during each of your Immersion PE labs so you will be prepared when you see your first hospital patient.
For a complete exam, your patient will be dressed in a gown that is typically tied in the back and may have snaps at the shoulders. A sheet is draped over the lap. These are moved during the exam so that only the part of the body being examined is exposed – either ask your patient to move them or ask permission before moving them yourself. Most patient gowns also have snaps at the shoulders that allow exposure of the upper chest while keeping the breasts covered.
The ideal position of the gown and drape is different for each section of the exam. If you’re not sure how to position the gown and drape in your physical exam labs, ask us for suggestions for how to maintain modesty and comfort.
Core techniques
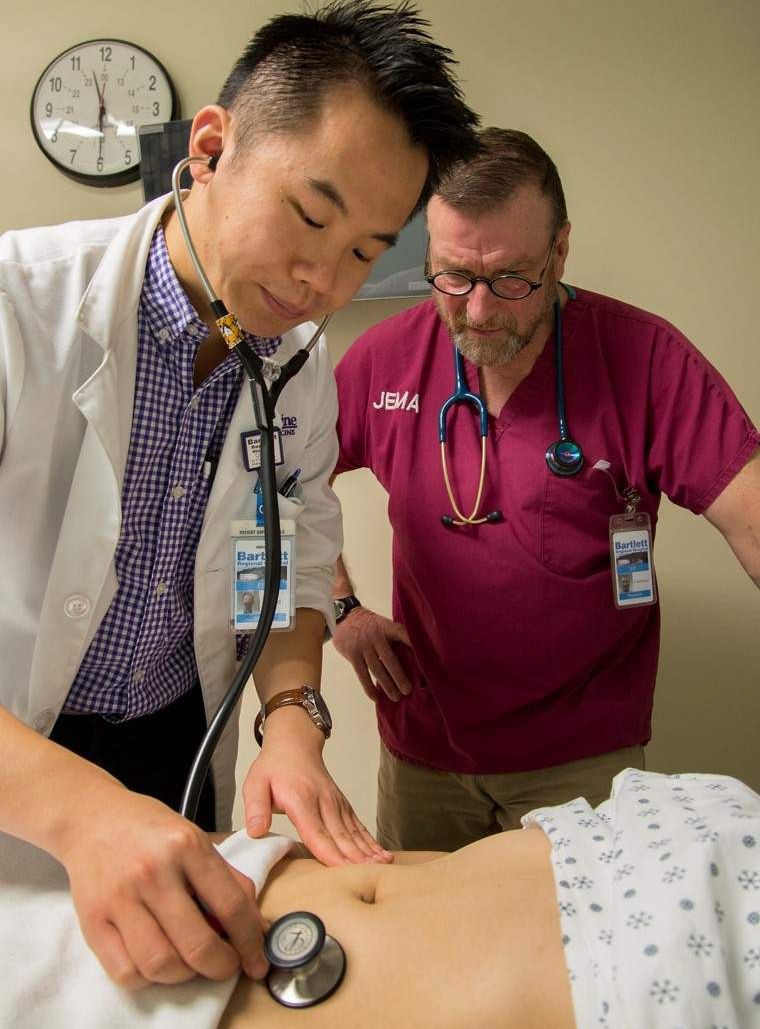
The physical exam is built on four core techniques: inspection, palpation, percussion, and auscultation. These techniques are typically performed in the same sequence for each body region, starting with inspection.
Inspection
Definition: The use of intentional observation to notice findings of illness and disease.
Inspection is the least mechanical and the hardest to learn of the physical exam techniques. It requires slowing down, which can be hard for all of us – in this digital age, the human attention span has been shortened by more than half.
Practice taking a conscious pause to observe and truly notice your patient’s appearance, affect, and surroundings and notice any findings of distress or disease, like facial expression, nonverbals, scars from previous surgeries, IV ports or skin changes. As you observe, correlate what you see with what you’ve learned from your patient’s history. If anything is unexplained, ask! For example, “I notice you have this scar. May I ask what it is from?”
Observing general appearance
You’ll already have carefully observed your patient as you interviewed them. Take a conscious moment to pause and consider what you have seen. For example,
- At first glance, do they look well or ill? This first impression of “sick” can help to establish the urgency of the situation.
- Are there nonverbal cues suggesting anxiety, discomfort, or pain?
- What is the level of consciousness? Is your patient alert, or are they sleepy or confused?
- How do they use speech and language? Are there any unusual features that suggest a neurologic or mental health disorder?
- Are there signs of poor nutrition, such as wasting around the temples or loose clothing or jewelry?
- Are there signs of poor perfusion, such as confusion or in lighter skinned individuals, pallor of the skin?
- Are there bruises or injuries that might suggest child abuse or intimate partner violence?
Palpation

Definition: The use of touch to characterize an area of the body
This technique is used to evaluate pulses, to assess different organs, and to observe for tenderness, masses, or swelling. You will use different parts of your hands and different techniques to palpate different parts of the body. For your patient’s comfort, make sure your hands are warm before palpation and begin away from any tender areas.
Percussion
Definition: Striking a part of the body to observe the sound and feeling produced.
Percussion can be either direct (your hand strikes your patient’s body) or indirect (your hand strikes your own fingers, which are pressed against their body). To practice, indirect percussion, place the third finger of your left hand firmly against a table or half filled plastic jug. Tap on your middle or distal phalanx using the tip of your right third finger as a mallet, swinging your right hand at the wrist. You are listening for the sound AND feeling the quality of the vibrations in the finger pressed against the body. Vary the pressure you apply with the finger pressed against the jug or table – do you notice the difference in percussion quality?
Auscultation
Definition: The use of a stethoscope to hear sounds produced by internal organs.
A quiet environment will increase the accuracy of your exam. Ask your patient and visitors tobe quiet, close the door, and mute the TV. With patients, always auscultate on bare skin, even if you are doing a brief exam in clinic and must work around clothing. Clothing can create sounds that fool you into thinking your patient has an abnormal finding or can make it harder to pick up on subtle abnormalities. You may not always see this modeled in clinical practice, where the environment and fast pace sometimes get in the way, but this is what you should strive for.
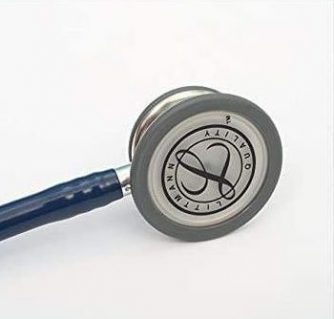
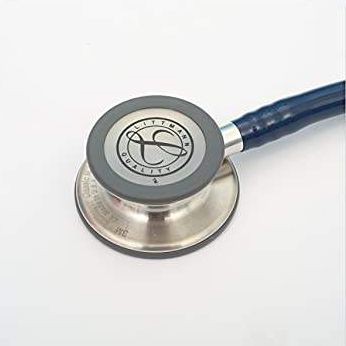
Examine and try out your stethoscope before lab. The stethoscope gifted by the Alumni Association is a tunable stethoscope with a larger diaphragm for adults and a smaller one for children. Apply firm pressure with either side to hear high frequency sounds, and light pressure for lower pitched sounds.
 |
 |
“Learn to see, learn to hear, learn to feel, learn to smell, and know that by practice alone you can become expert.”- Sir William Osler
Classic stethoscopes have a concave bell on one side that is used detect lower pitched sounds. Your stethoscope includes a rubber rim that converts the pediatric side of your stethoscope to a bell. Since you may see kids in clinic, we recommend using your stethoscope as is.
After placing your stethoscope in your ears with the earpieces pointing forward, tap against the surface you plan to apply to your patient’s skin. You should hear a fairly loud ‘tap’ through the earpieces. If you don’t, twist the head of the stethoscope with one hand while holding the end of the tubing with the other. After the head turns, tap again to confirm that the correct side of the head is transmitting sound through the earpieces. Place your stethoscope in each of the following locations on yourself and see if you hear something like the sounds below! Use headphones for these and other audio clips in this guide.
Heart sounds: listen just to the right of the sternum.
Bowel sounds: listen over the middle of the abdomen
Lung sounds: listen on the side of the chest, over the lower ribcage
Trauma-informed approach
Over half of people have experienced some type of trauma, such as emotional, physical or sexual abuse or violence in their home or community. The long term effects vary person to person but a growing body of research shows that trauma has long-lasting health impacts that increase the need for health care. Trauma can also impact one’s feeling of safety in the clinical setting and failure to recognize this can lead well-meaning health care providers to inadvertently re-traumatize their patients. The physical exam can be particularly stressful, and fear and anxiety about the exam can lead some patients to avoid healthcare altogether.
Trauma-informed care emphasizes physical, psychological and emotional safety, to help survivors of trauma rebuild a sense of control and empowerment. Using a trauma-informed approach to the physical exam with all patients can maximize comfort and trust for all patients. The goal is for patients to be informed and in control throughout the exam.
Before the exam
- Set an agenda for the exam
- Ask about concerns or questions
- Ask how you can increase comfort
- Ask your patient to stop you if uncomfortable
During the exam
- Use simple, clinical language
- Maintain modesty with gown & drape.
- Explain what you are doing
- Ask permission before each section
- Watch patient cues for discomfort
- Stay within eyesight
- Respect personal space
Some exam elements, like the oral exam, thyroid exam and genital exam may feel especially threatening to those who have experienced trauma. Always explain what you will do and why and ask the patient’s permission before starting. Because of the power differential inherent to the physician patient relationship, some patients may feel uncomfortable speaking up. In your hospital tutorials, where we are not part of the care team, you can explicitly tell patients that it is okay to decline any aspect of the exam that they are uncomfortable with.
Reporting the Exam
The exam is reported in a standard and predictable way, so your reader or listener can anticipate and interpret your findings. To maximize efficiency and patient comfort, a complete exam is usually PERFORMED from head-to-toe. However, it is REPORTED by organ system.
For example, the carotid pulses are checked as the neck is examined and the foot pulses are checked at the end of the exam, but these are both reported with the cardiovascular exam.
In Immersion, you will learn to report typical physical exam findings. During your blocks, you will learn much more about pathophysiology and abnormal findings. We will return to reporting the exam in each advanced physical exam workshop.
Standard vocabulary and reference points
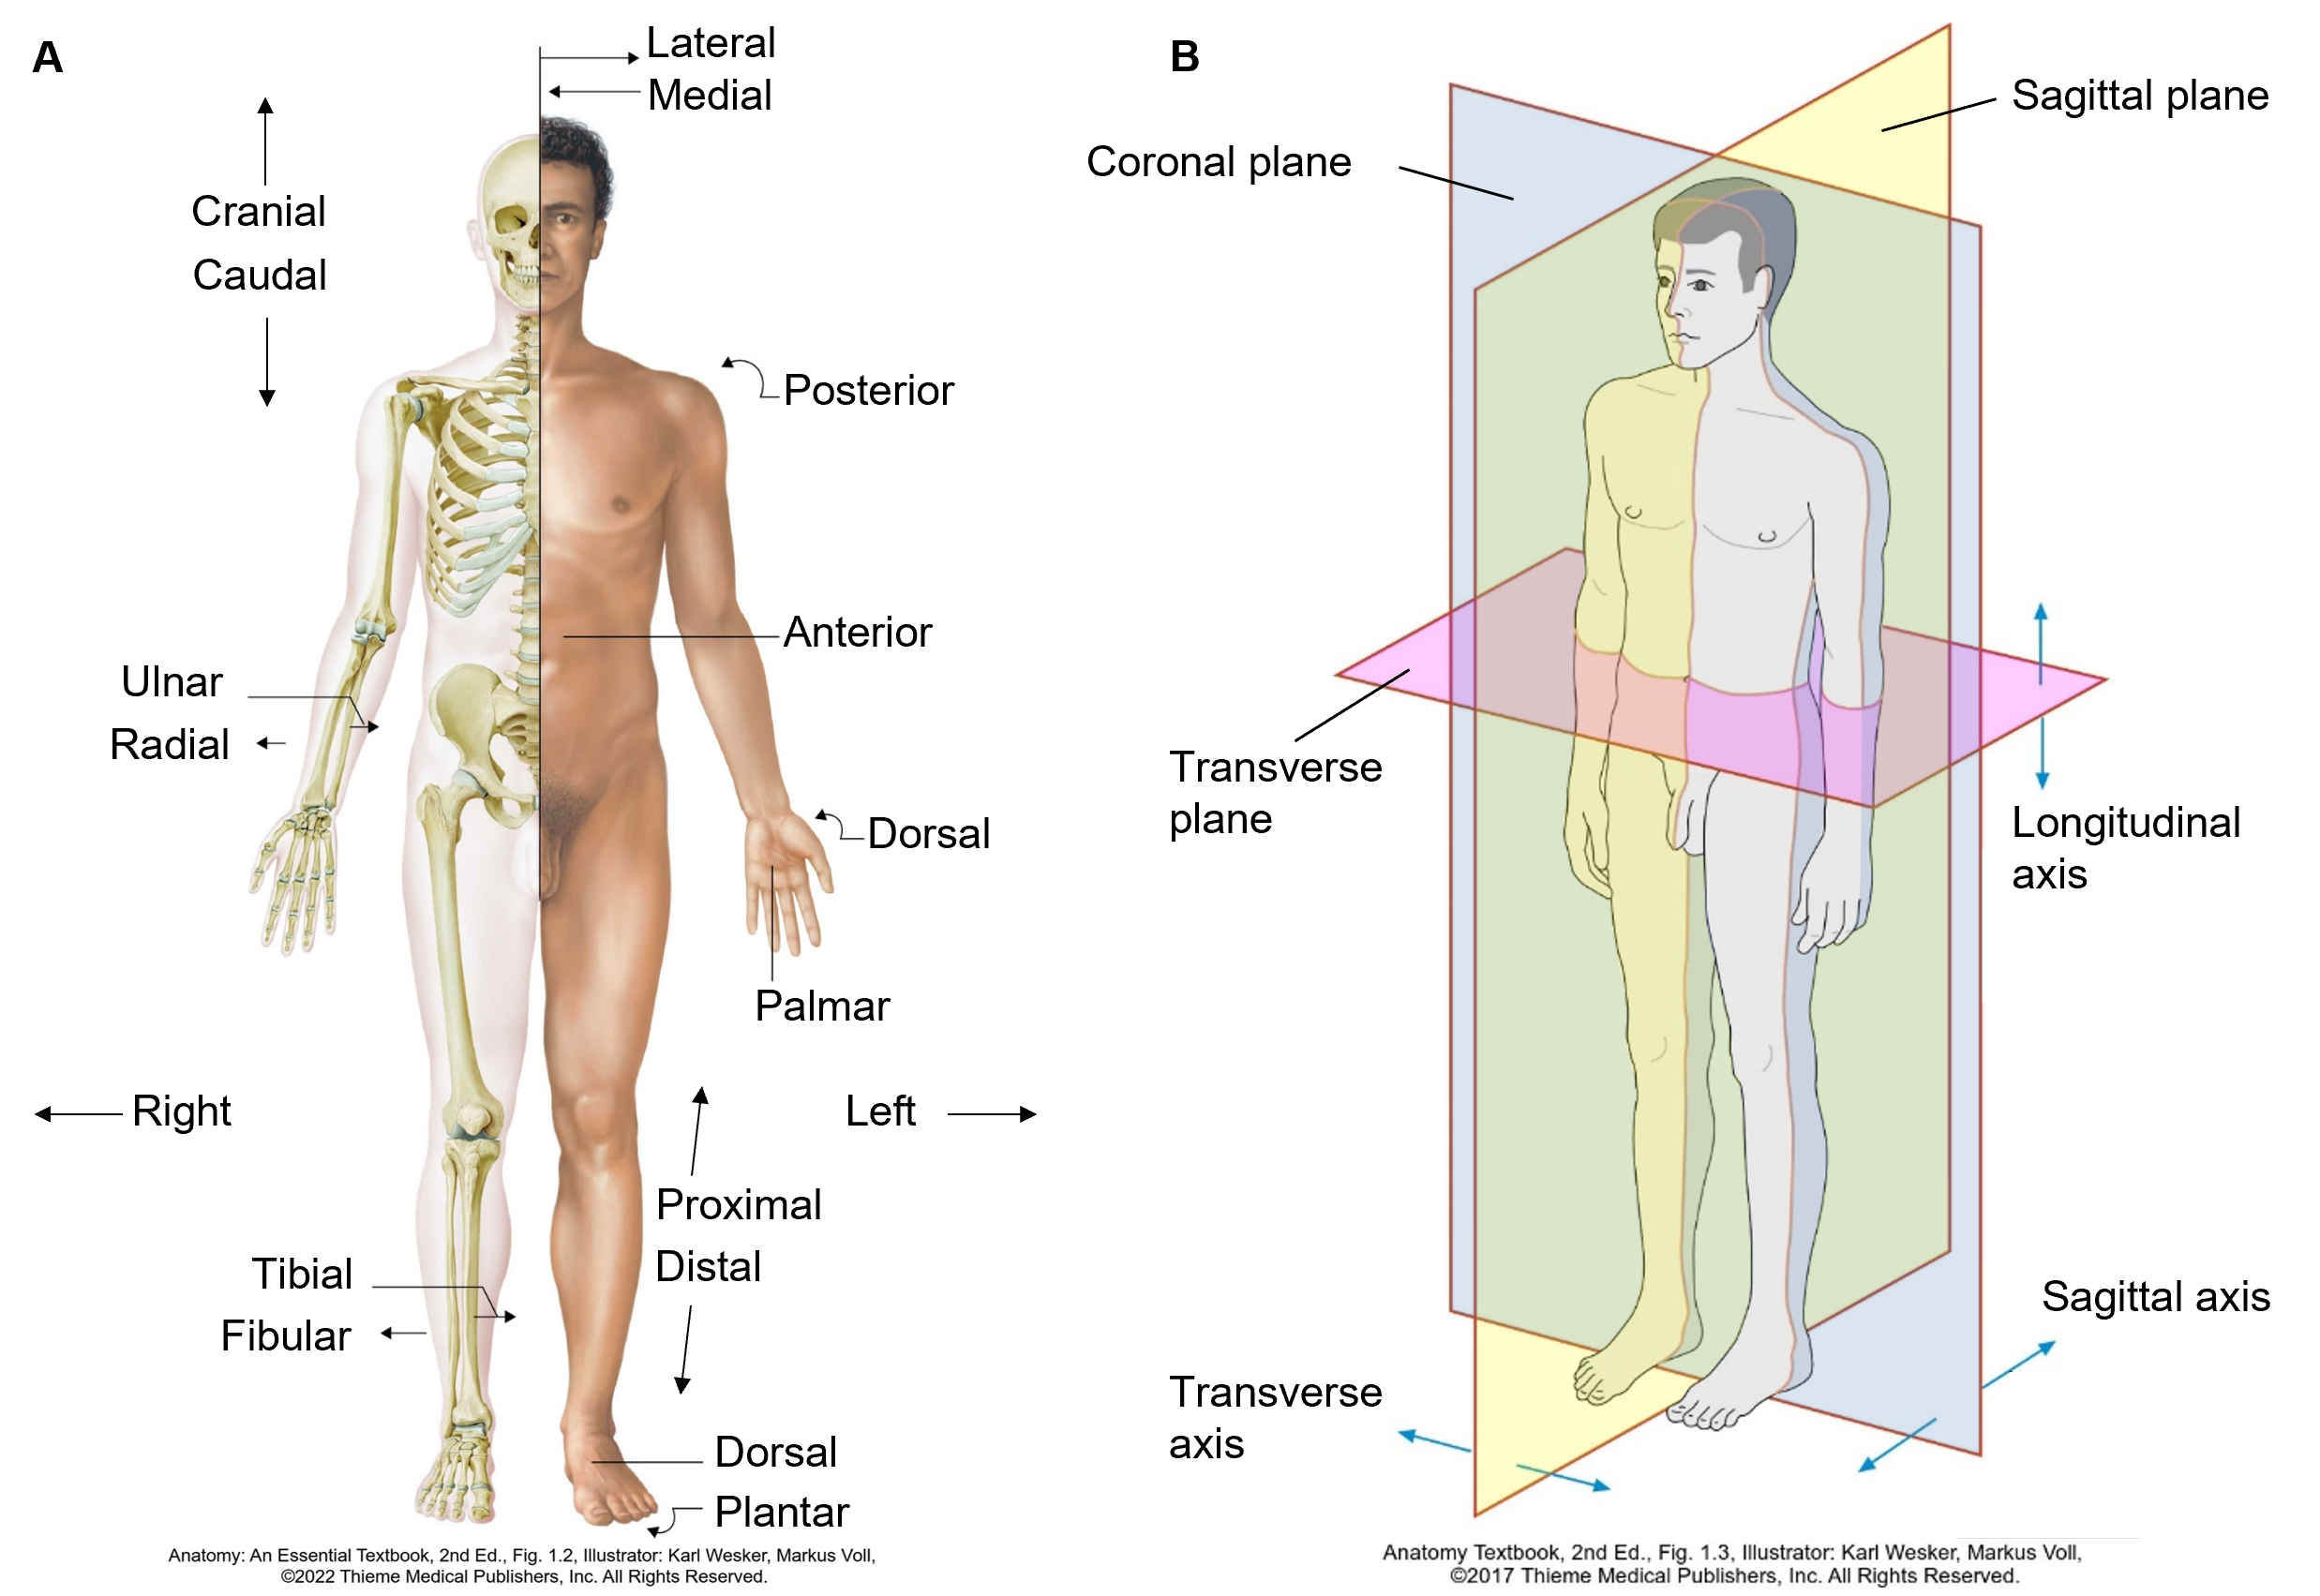
The reference points and terms you have learned in Anatomy are also used to describe physical exam findings. These are based on the anatomic position: standing and facing forward, with the palms facing forward. Here’s a refresher.
| Anatomic Term | Definition |
|---|---|
| Anterior or ventral | Near the front |
| Posterior or dorsal | Near the back |
| Superior or cranial | Upward, or near the head |
| Inferior or caudal | Downward, or near the feet |
| Medial | Toward the mid-line |
| Lateral | Away from the mid-line |
| Proximal | Closer to a reference point (often the trunk) |
| Distal | Farther from a reference point (often the trunk) |
| Sagittal plane | Divides the body into right and left parts |
| Coronal plane | Divides the body into front and back parts |
| Transverse | Divides the body into upper and lower parts (or cross-sectional plane) |
Typical findings
As you learn the exam in Immersion, you should also learn how to describe the usual findings in a healthy person. The sample document below is for a healthy person with no unusual or abnormal findings.
Abnormal findings
Describe abnormal findings as clearly and concisely as you can. You’ll learn more about abnormal exam findings, how to describe them, and what they mean as you complete each block. This list of common abnormalities can serve as a reference in the mean time (you don’t need to read the whole thing now).
| Skin, hair and nails | |
| Skin | For skin lesions, report location and type of lesion
Additional descriptors:
|
| Nails | Clubbing
Pitting |
| Hair: | Alopecia
Generalized alopecia of scalp, brows and lashes |
| Eyes | |
| Visual acuity | Decreased visual acuity. Note the acuity in each eye.
20/70 R eye. 20/50 L eye. |
| Visual fields | Visual field defect. Note the quadrant(s) affected, using the terms superior, inferior, nasal, and temporal to describe them.
Visual field defect in L inferotemporal visual field |
| Eyelids | Ptosis
Stye Skin lesions (see skin above) |
| External eye | Conjunctival injection
Conjunctival pallor Scleral icterus |
| Pupils | Asymmetric corneal light reflection
Absent red reflex Asymmetric pupils Decreased reaction to light R pupil 3 mm & reactive; L pupil 5 mm and nonreactive |
| Ears | |
| External ear & EAC | Swelling, tenderness or discharge |
| Tympanic membrane | Erythema or bulging
TM bulging and erythematous; landmarks not visible Presence of middle ear effusion |
| Hearing | Decreased hearing. Note method of testing. |
| Nose and sinuses | |
| Internal nose | Palloror injection of mucosa
Nasal polyps Ulcers. Note size and location. Discharge |
| Sinuses | Sinus tenderness
L maxillary sinus tender to palpation |
| Oral cavity | |
| Oral mucosa | Plaque
Ulcers Masses |
| Posterior pharynx | Erythema
Exudate Tonsillar enlargement |
| Dentition and gingivae | Caries
Gingival erythema or swelling |
| Base of tongue | Ulceration or mass (suggesting malignancy) |
| Parotid glands | Swelling |
| Temporomandibular | Tenderness or crepitus |
| Neck and thyroid exam | |
| Lymph nodes | Enlargement. Note size, tenderness, mobility, consistency and location of enlarged node(s)
2.5 cm firm, non-tender, fixed node, L posterior cervical triangle |
| Thyroid | Nodules: 1.5 cm palpable nodule, non-tender in R lobe
Enlargement: Thyroid diffusely enlarged, non-tender |
| Chest exam | |
| Inspection | Evidence of respiratory distress: tachypnea, accessory muscle use, retractions
Decreased chest expansion |
| Palpation | Asymmetric tactile fremitus
Decreased tactile fremitus ½ way up the R posterior chest Vertebral, rib, CVA or chest wall tenderness |
| Percussion | Dullness or hyperresonance to percussion.
Hyperresonant to percussion entire L chest |
| Auscultation | Adventitious sounds: fine crackles, coarse crackles, wheezes, stridor, rubs.
Coarse crackles present in the R lower lung field Decreased breath sounds Decreased breath sounds L lower lung field |
| Cardiovascular exam | |
| Inspection | Abnormal movement of the chest wall. |
| Palpation | Abnormal apical impulse: enlarged, sustained, and/or laterally displaced.
Apical impulse palpable lateral to the MCL in the 5th ICS |
| Auscultation | Abnormal rate – tachycardia or bradycardia
Irregularly irregular rhythm Presence of an S3 or S4 gallop Murmurs should be described with timing, quality location & radiation |
| Pulses | Asymmetric or absent pulses
2+ and symmetric carotid and radial pulses. Absent dorsalis pedis and posterior tibial pulses bilaterally. Bruits |
| Edema | Note the proximal extent of edema and presence of pitting or weeping;
Pitting edema to mid-thigh with weeping below the knee. Often graded from absent to 4+ (scale is subjective) 3+ pitting edema in bilateral lower extremities, up to mid-thigh |
| Abdominal exam | |
| Inspection | Scars. Describe size and location.
Distension |
| Auscultation | Abnormal bowel sounds: Hyperactive or absent. |
| Percussion & palpation | Tenderness. Note location and presence or absence of guarding.
RUQ tender to palpation, with involuntary guarding. Abnormal liver size or consistency |
| Neurologic exam | |
| Mental status | Abnormal level of consciousness: lethargic, obtunded or comatose
Abnormal orientation Oriented x 2 (to self and place only) Abnormal recall Recalls 1/3 items at 5 minutes. |
| Cranial nerves | Note the affected nerve(s) and how each abnormality was detected.
CN II-XII are intact, except for R CN VI. Pt is unable to abduct R eye. |
| Motor: | Abnormal strength. Compare side to side and grade 0-5.
Strength 5/5 in all major muscle groups except 4-/5 in R hip flexors Abnormal bulk: Bulk is normal in UE and LLE. Atrophy of R calf and foot muscles noted |
| Reflexes: | Abnormal Babinski reflex
Toes upgoing on R Asymmetric or changing reflexes. Compare side to side and grade 0-4. Reflexes 1+ at biceps, triceps & patella. L Achilles 1+, R Achilles 4+ |
| Sensation | Describe the location of abnormal sensation and modalities tested
Decreased sensation to light touch from toes to knees bilaterally Positive Romberg |
| Cerebellar | Describe the abnormal test
Finger to nose test abnormal with bilateral dysmetria |
Problem focused exam
In Immersion, you will learn a comprehensive exam but in your Primary Care Practicum, you will rarely see your preceptors perform as complete an exam on one patient. They are much more likely to perform an exam focused on the one or two organ systems most relevant to the reason the patient is being seen. This problem focused exam is used to answer specific clinical questions about the patient you are seeing. As you learn about each organ system in your Foundations Blocks, we will teach you new exam maneuvers that can help you answer specific clinical questions. You will also learn how to focus and how to expand your exam based on your patient’s chief concern and the clinical setting
