
Head and Neck Exam
Benchmark physical exam you will be expected to demonstrate at the end of FCM:
Eyes
- Measure visual acuity
- Inspect the external eye
- Observe corneal light reflex
- Assess size and reactivity of pupils
- Assess the red reflex
- Perform fundoscopy (practiced in Term 3)
Ears
- Assess hearing
- Inspect and palpate the auricle and mastoid
- Perform otoscopy
Nose
- Inspect the external nose for symmetry & discharge
Mouth
- Inspect the oral cavity, including the teeth and gums
- Palpate salivary glands
- Palpate temporomandibular joints (TMJ)
Neck
- Inspect the neck for symmetry and masses
- Palpate the cervical lymph nodes
- Palpate the thyroid gland
- Auscultate the carotid artery
- Palpate the carotid pulse
Hypothesis driven maneuvers (Term 2)
- Differentiate causes of hearing loss with Weber and Rinne tests.
- Palpate the sinuses in suspected sinusitis
- Inspect the nasal mucosa in suspected allergic or infectious rhinitis or sinusitis
A comprehensive head and neck exam includes the eyes, ears, nose, mouth, throat, and neck. In the clinic, the head and neck examination is often more limited and tailored to the patient’s history and presenting concern. Experienced clinicians may also test the cranial nerves as part of the HEENT exam, depending on the chief concern.
The HEENT exam is usually performed in the seated position but in the hospital, it may be done reclining.
To prepare for the Head and Neck Physical Exam Lab, view the landmarks and prepare to perform each of the maneuvers by either watching the Exam Video OR reading carefully through the list of exam maneuvers.
A short demonstration of the exam in class will be followed by time to practice.
Immersion: Landmarks
Immersion: Exam Maneuvers
Perform an integrated skin exam as you complete the following maneuvers.
Measure visual acuity in each eye
Normal visual acuity is 20/20, meaning your patient can read print at 20 feet that someone with normal vision can read at 20 feet. As visual acuity decreases, the denominator goes up – Visual acuity of 20/80 indicates that a patient can recognize at 20 feet a symbol that a person with normal acuity can recognize at 80 ft.
Hold a pocket vision screener or smartphone app the indicated distance away from your patient. Ask them to cover one eye and read the lowest line they can with the other, then switch eyes and repeat.
Inspect the external eye
Carefully observe eyelids and eyelashes, conjunctiva, sclera, cornea, anterior chamber, and iris. Note any differences in symmetry, redness or swelling of the eyes and surrounding tissues.
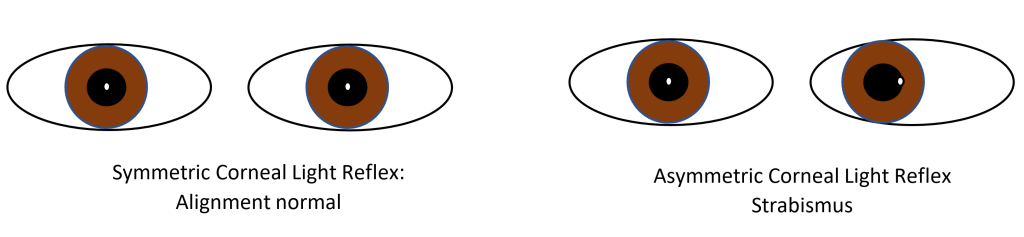
Observe the corneal light reflex
Hold your penlight directly in front of your patient, about 12 inches away. The light should appear in the same spot in both eyes, indicating that they are normally aligned. An asymmetric corneal light reflex indicates that your patient has strabismus, which can cause long term vision problems in children.
Assess pupil symmetry & reactivity
Observe the size of the pupils, which are typically equal in size. Anisocoria of < 0.5 mm is common and is considered normal if the pupils react to light.
Next, assess the reactivity of the pupils by observing pupillary constriction with direct and consensual light. In people with dark brown irises, pupils may be easier to see if the light is shone from below.
Perform fundoscopy
Fundoscopy (also called direct ophthalmoscopy) allows you to view the interior structures of the eye: the retina, retinal vessels, macula and optic disc, also called the fundus. In Immersion, you will only be expected to be able to demonstrate the red reflex (steps 1-3). We will return to examine the retina later on.
- Position your patient so that your eyes are at the same level.
- Have the patient gaze at a distant object in a darkened room.
- Starting with a 0 lens, focus on the lashes from 124 inches away, and look for the red reflex. The red reflex should be symmetric and without spots, indicating that light is reflecting equally off of each retina.
- Hold the ophthalmoscope in the R hand and use your R eye to examine the patient’s R eye. Switch hands/eyes to examine the patient’s L eye.
- Moving in at an angle of 15 degrees lateral to the patient’s line of vision, focus on the retina by rotating the lenses until the retinal vessels are clearly visible. Follow the vessels until you see the optic disk. Carefully examine as much of the retina as you can.
Inspect the auricle and mastoid
Observe for swelling, erythema, and skin lesions – the ear is a common site for skin cancers.
Assess hearing
Hold your fingers an equal distance from each ear and rub the fingers on one side together, asking which ear they can hear the sound in. Compare one side to the other and to your ability to hear the sound. This is an insensitive test for loss of hearing but can easily be done at the bedside.
Perform otoscopy
-
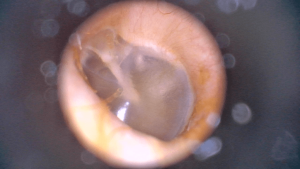
Left tympanic membrane. brownmedpeds.org Stand on the patient’s left to examine the left ear
- With your right hand, gently pull the left ear up and back to straighten the ear canal.
- Hold the otoscope in your left hand with the thumb and first two fingers, like a pen, or around the barrel. To stabilize your hand, brace your little finger against your patient’s forehead so that your hand moves with the head if it moves.
- Place the otoscope partway into the external auditory canal.
- Examine the canal and the tympanic membrane
Repeat for the right ear, switching sides and holding the otoscope in your right hand
Observe the external nose for symmetry and discharge
Inspect the oral cavity and posterior pharynx
With a penlight and the mouth opened as widely as comfortable, examine:
- Teeth, tongue, and hard palate
- Buccal mucosa and lateral teeth. Ask your patient to pull their own cheek out slightly, or with permission, gently use a tongue blade.
- Floor of the mouth. Ask your patient to place the tip of the tongue on the roof of the mouth.
- Posterior pharynx. If the clinical situation requires a careful exam, ask your patient to say “aaah” to raise the soft palate. If necessary, you can also use a tongue depressor held gently on the tongue.
Palpate the parotid and submandibular salivary glands
Palpate the temporomandibular joint (TMJ)
With your fingers placed just anterior to the ear, palpate as your patient opens and closes the jaw, feeling for crepitus (crackling) or tenderness.
Inspect the neck for symmetry and masses
Palpate the lymph nodes
Moving the pads of your fingertips in small circular motions, attempt to roll the nodes under your fingertips, checking the area of the anterior and posterior cervical chains and the supraclavicular nodes. Normal lymph nodes are mobile and less than 1 centimeter in size but it is common to have mildly enlarged nodes in the anterior and posterior cervical chains.
Inspect and palpate the thyroid
Inspect the lower neck. The outline of the lobes of the thyroid may be visible, more often in females than in males.
Because the thyroid exam can be triggering for those with a history of trauma, provide a clear explanation of what you will do, ensure comfort and perform the exam from beside or in front of your patient rather than from behind. You may also skip this exam in those with a history of trauma and no symptoms of thyroid disease.
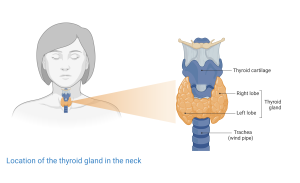
Identify the thyroid and cricoid cartilages. The isthmus of the thyroid lies just below the cricoid. With the neck flexed slightly, place your index finger just below the cricoid and as your patient swallows a sip of water, feel for the isthmus. After locating the isthmus, move the fingers to either side of the trachea. As the patient swallows again, palpate each lobe of the thyroid gland, observing for enlargement or masses.
Each lobe of the thyroid is normally about the size of the distal phalanx of the thumb. Because it lies partly under the sternocleidomastoid, the thyroid may be difficult to feel in some people. If you palpate carefully and cannot identify it, move on.
Palpate and auscultate each carotid artery
Gently palpate each carotid artery one at a time, assessing the strength of the pulse. As the patient briefly breath-holds, place your stethoscope lightly over each carotid artery, listening for radiation of heart murmurs or bruits, which can indicate narrowing of the artery.
Immersion: Exam Video
Immersion: Documenting the Exam
Practice using precise and descriptive language to describe your exam findings. Although you may eventually present normal findings more concisely, you will still need to provide this level of detail for body regions or organ systems that might be involved in a patient’s presenting concern.
Head: Scalp and skull without lesions or tenderness.
Eyes: Vision 20/20 in each eye with corrective lenses. Conjunctivae without injection. No scleral icterus. Lids without lesions. Corneal light reflection symmetric. Pupils equal, round, and reactive to light directly and consensually. Red reflex present bilaterally.
Ears: Hearing intact to finger rub bilaterally. External auditory canals are free of wax. Tympanic membranes pearly white and intact, with cone of light.
Nose: External nose symmetric.
Mouth: Mucosa pink with no ulcers. Normal dentition. Gums without erythema or bleeding. Tonsils symmetric without erythema or exudate.
Neck: Full range of motion. No cervical lymphadenopathy. Thyroid smooth, non-tender, without masses or thyromegaly
Immersion: Knowledge Check
Term 2: Hypothesis Driven Maneuvers
Weber and Rinne tests
The Weber and Rinne tests are used to differentiate conductive and sensorineural hearing loss. Conductive hearing loss is caused by problems with the external or middle ear, which amplify and conduct sound to the inner ear. Sensorineural hearing loss is caused by problems with the cochlea, auditory nerve, or brain. Differentiating them can be clinically useful – conductive hearing loss is often caused by cerumen impaction, which can be treated in the clinic, while sudden onset of sensorineural hearing loss suggests the need for an urgent ENT referral.
The Weber test is performed on patients with asymmetric hearing. Strike the 512 Hz tuning fork against your knee to make it vibrate, then place it on your patient’s head in the midline. The bones of the skull will conduct the sound to the inner ears. Ask your patient which ear hears the sound best.
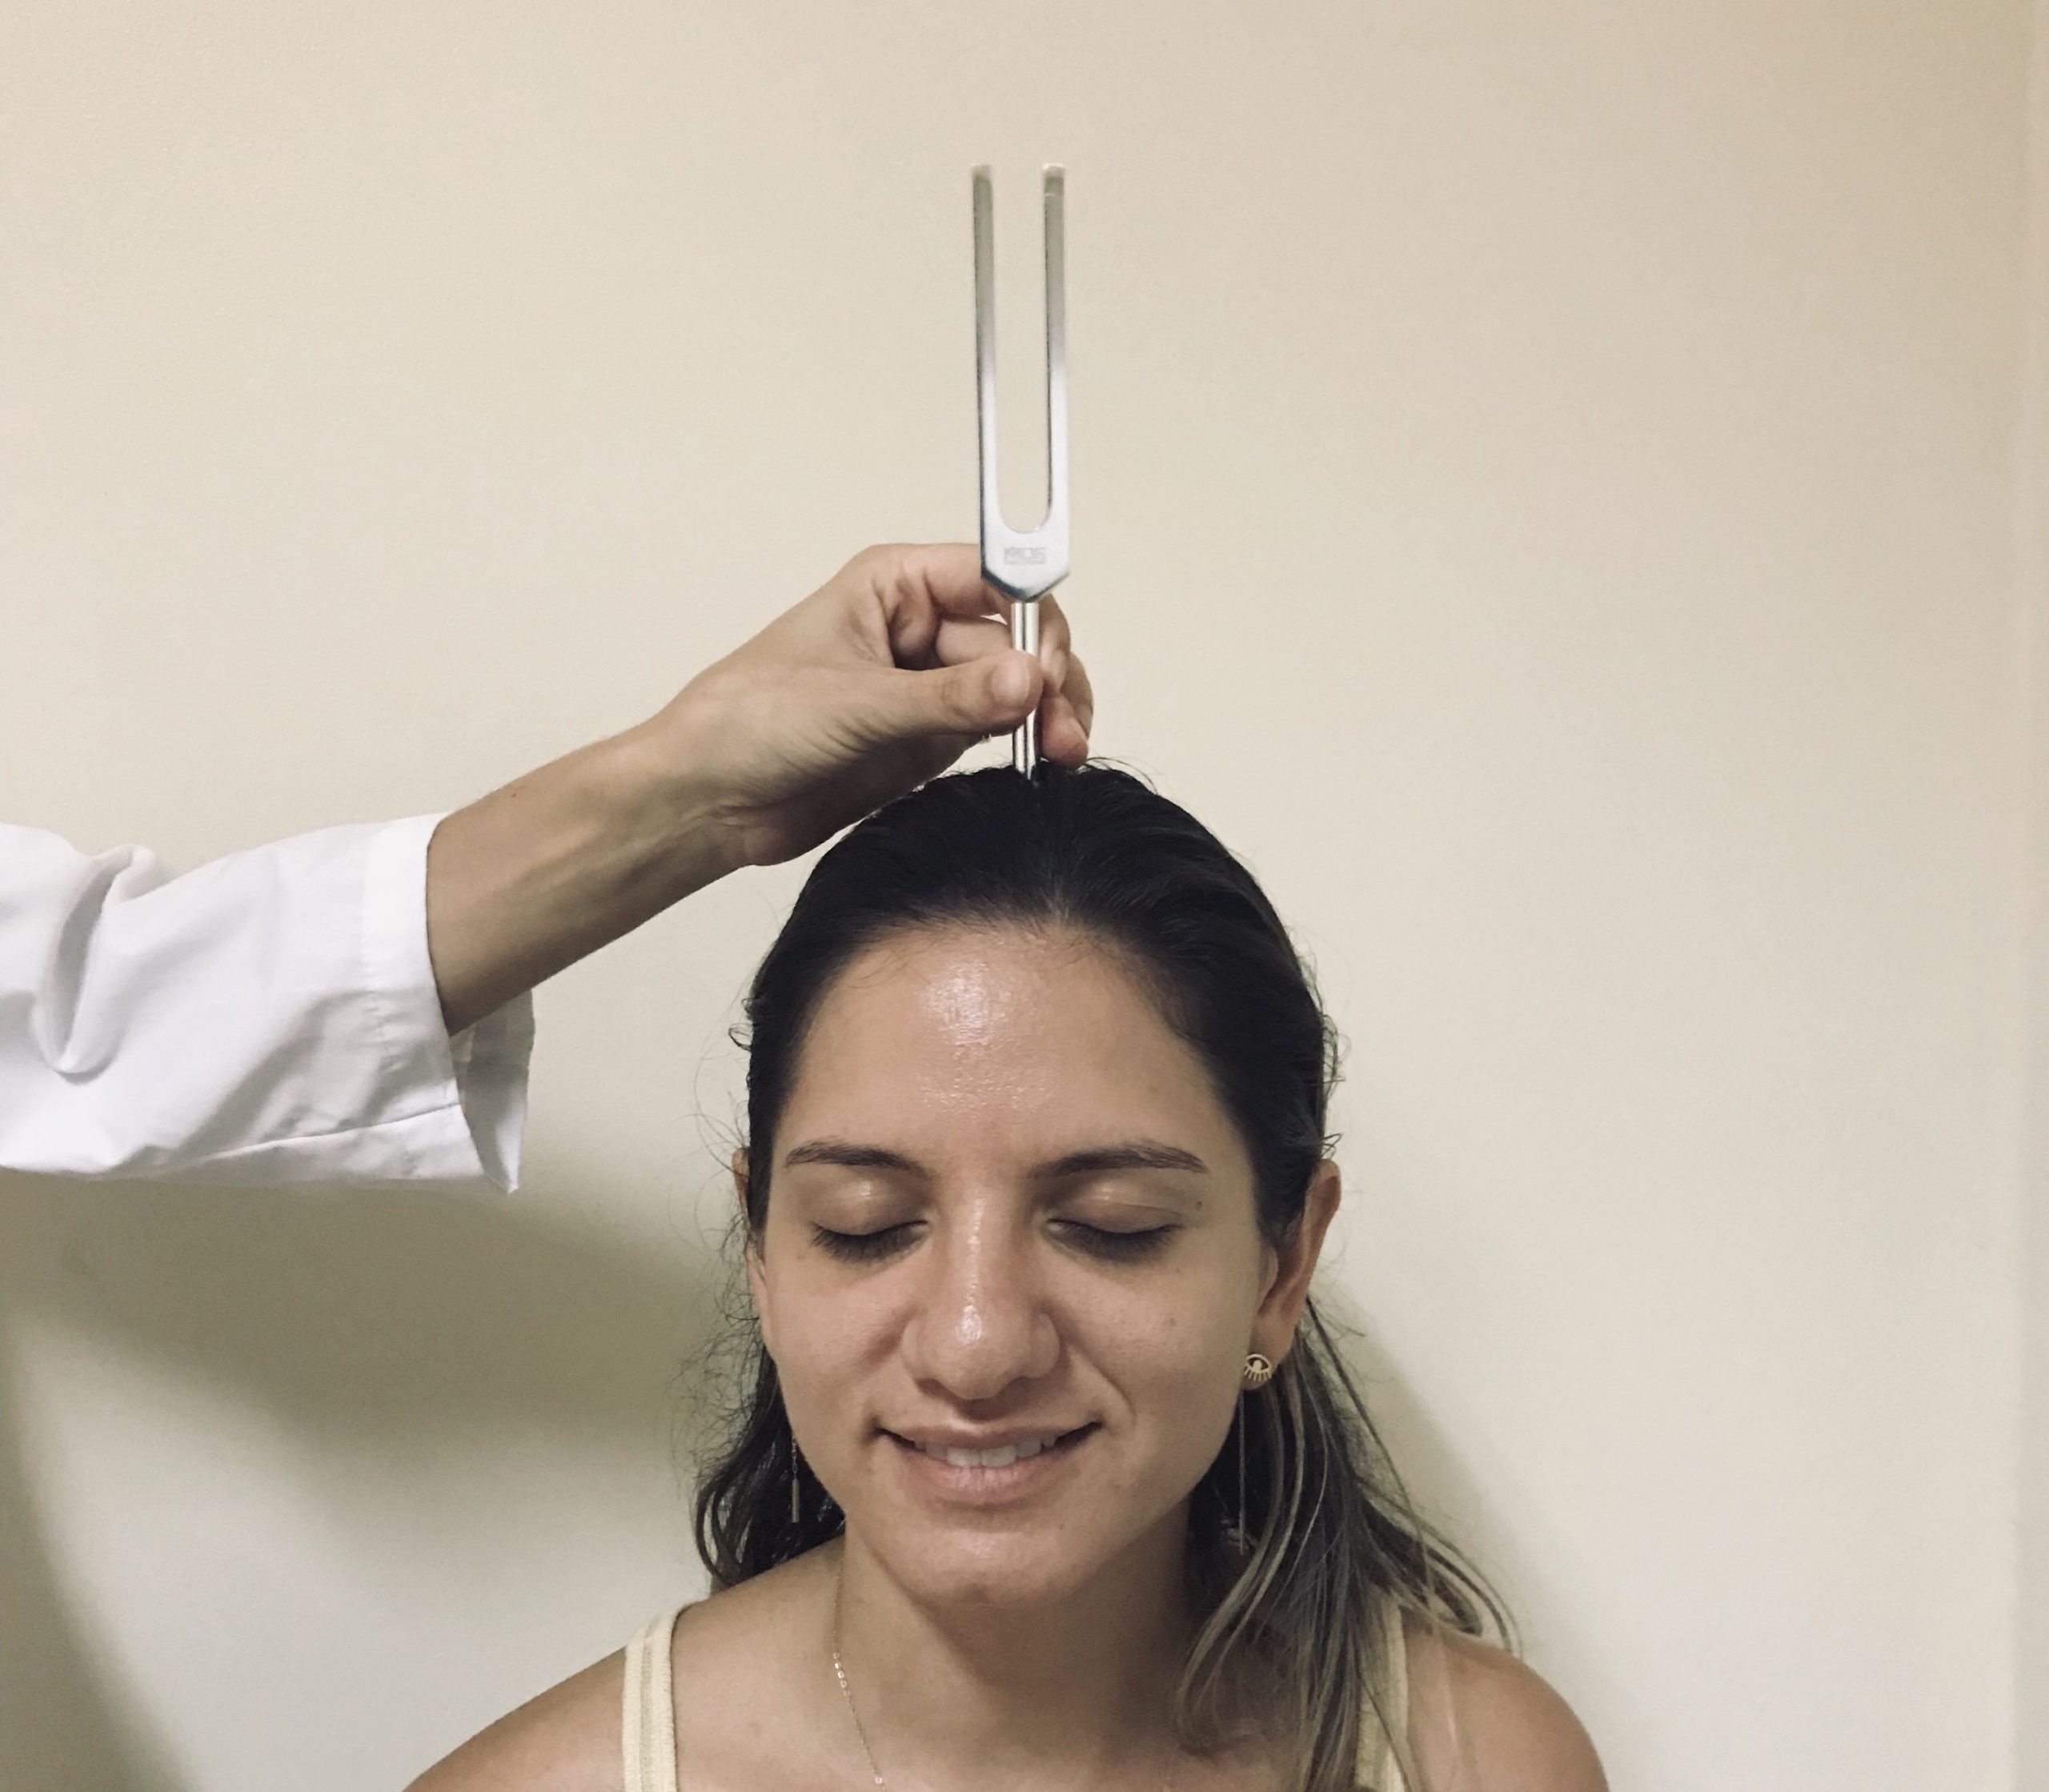
If the ‘bad’ ear hears the sound better, there is conductive hearing loss in that ear. The relative lack of sound conducted from the outside world to the inner ear makes the tuning fork sound louder – try it on yourself by blocking one ear with your finger.
If the ‘good’ ear hears the sound better, it means the ‘bad’ ear is affected by sensorineural hearing loss.
For the Rinne test, the vibrating tuning fork is placed on the mastoid process, testing conduction of sound through bone. It is then held just lateral to the ear testing conduction of sound through air. The patient is asked which position produces the loudest sound. Normally, air conduction should be better than bone conduction.
- In sensorineural hearing loss, air conduction is also better than bone conduction.
- In conductive hearing loss, bone conduction is better than air conduction.
Inspect the nasal mucosa
If you suspect sinusitis, allergies, or nasal polyps, inspect the inside of the nose with the otoscope. Place the largest available speculum that will comfortably fit inside the nostril. Gently elevate the tip of the nose to better see the nasal cavity. Direct the speculum posteriorly and superiorly as you inspect the nasal cavity. Pale nasal mucosa suggests allergies as the cause of post-nasal drip. In sinusitis, you may be able to see purulent nasal secretions.
Palpate the sinuses in suspected sinusitis
In suspected sinusitis, many providers palpate the paranasal sinuses above the eyes (frontal sinuses) and over the malar eminences (maxillary sinuses). Sinus tenderness is a sensitive but not a specific finding of acute bacterial sinusitis.
Term 2: Knowledge Check
Term 3: Problem Focused Eye Exam
Eyes are not aligned with each other
unequal pupil size
opposite eye
