
Terrarium Model of Earths’ Energy Balance
Chris Terai and Stephen Po-Chedley
Overview
Focus Questions:
- What keeps the equator from getting hotter and hotter and the poles from getting cooler and cooler?
- In what ways is energy transferred around the Earth?
- What causes the Hadley circulation?
Learning Goals:
Students will be able to…
- Understand how energy is conserved and transported in the Earth’s climate system.
- Identify and describe the physical processes that result in heat transfer (radiation, evaporation, convection, advection, condensation).
- Answer the questions, “What is the fundamental cause of atmospheric circulation on the Earth? How is the Earth’s energy balance affected by this circulation?”
Background Information for Teachers
The energy budget of Earth, as a whole, is determined by incoming shortwave radiation in the form of sunlight and outgoing longwave radiation, infrared radiation that depends on the temperature of the Earth. Within the different components of the Earth’s climate system, the energy budget is determined by a variety of energy transport mechanisms (radiation, atmosphere, ocean heat transport).
Sunlight warms the tropics more than the polar latitudes, producing a difference in the temperature between the poles and the equator. The ocean and atmosphere move heat poleward to help warm the polar latitudes. In the atmosphere, the warmer tropical atmosphere holds more water vapor than the rest of the atmosphere. During evaporation, energy is transported from the warm ocean into the atmosphere. That energy can be transported in the form of water vapor, until the water condenses, usually in clouds, to help heat the atmosphere. Therefore, when moist warm air is transported from the tropics towards the poles where it condenses, energy is being transported from the tropics to higher latitudes.
We recreate this kind of situation inside the terrarium. One side of the terrarium will be heated with a 250W light bulb. The other side will be cooled with a glass of ice water. There will also be about a centimeter of water in the aquarium. A thermally direct circulation will develop within the terrarium. There will be an upward motion of air under the lamp and downward motion under the ice water. The air circulation will be visible once you strike a couple of matches and drop them into the terrarium. Water vapor will condense onto the smoke particles and create cloud droplets.
Since you can see the circulation in motion, the demo provides a way of getting the students to figure out what is going on in the terrarium. Many layers of complexity can be added to the questions, depending on the students’ backgrounds.
Prior Knowledge for Students
Students will know from experience that warm air rises and cold air descends from looking at hot air balloons or from noticing that in winter it tends to be cooler closer to the floor, even when the heater is running. This will help them understand the basic things that drive convection in the terrarium. They will also know from experience that when they jump out of the pool, it tends to feel cold, even if the air temperature is warm. The coolness comes from the loss of thermal energy when the water evaporates from the skin. During evaporation, the body’s thermal energy is being used to turn liquid water into water vapor. This transfer of energy also happens when water evaporates from the sea surface into the air. The energy is transferred from the water into the air.
All of the students should know the general shape of the Hadley circulation, since the worksheets will be asking the similarities and differences between the circulation seen in the terrarium and the Hadley circulation.
Many of the students should also understand the different mechanisms of heat transfer: conduction, radiation, convection, evaporation, condensation. It will be very helpful if they understand evaporation and condensation, such as the concept that when water droplets condense, heat is released. For example, a cold can in a humid environment where droplets form on the side of the can will warm up quicker than a cold can in a dry environment at the same temperature, where droplets don’t form on the side, because the air is too dry.
Anticipated Challenges
Most of the challenges will be in preparing the demo. First, the terrarium needs to be constructed. Then it needs to be tested before it can be used in the classroom setting.
When running the demo and having the students do the worksheets, the students’ backgrounds on heat transfer may span a wide range. It is up to the teacher to decide whether a lesson on different heat transfer mechanisms is necessary.
Sometimes when the terrarium is run for longer than 30 min, condensation starts to form on the glass walls. You may need to reapply the defogging liquid in that case.
Assessment
The students will be evaluated on their answers to the worksheet.
Materials
- See-through box with lid (aquarium…)
- Lamp (preferably high wattage ~250W)
- Dark-colored paper
- Defogging liquid
- Ice Cup for ice (preferably with a lip)
- Water
- Matches
- Rocks (optional)
- Documents
- Student Handout (.doc)
- Terrarium Schematic (.pdf)
- Answer Key (request password from uwpcc@uw.edu)
Procedure
Preparation:
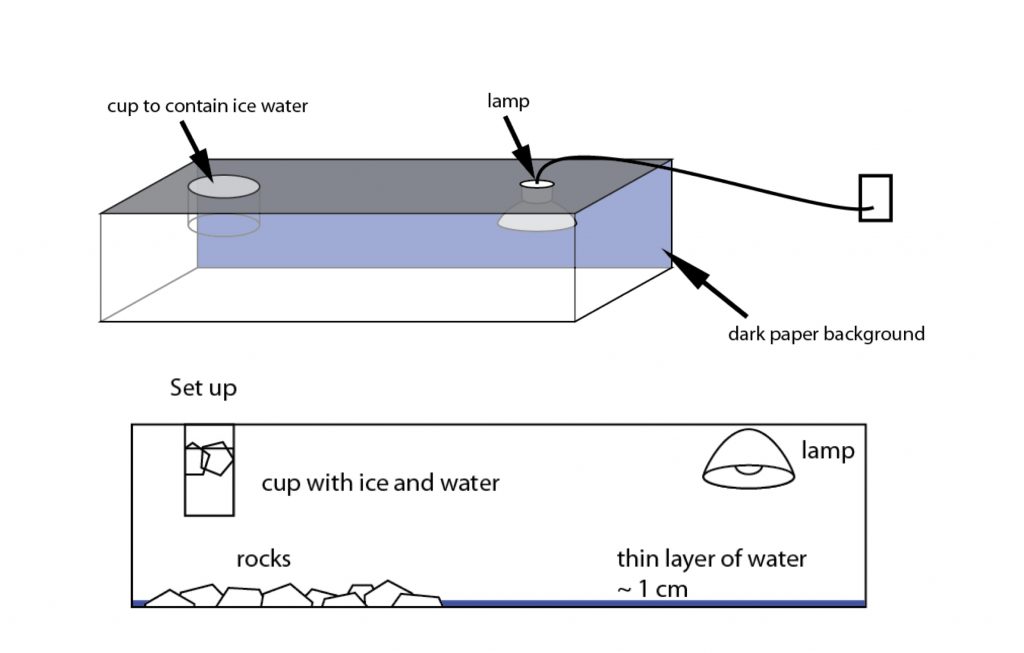
Build the terrarium as seen in the figures above.
- Cut out a hole in the lid of the aquarium so that the cup that holds the ice can fit through, but not too big that it falls through (if the cup does not have a lip, attach the cup to the lid using some epoxy).
- Cut a hole on the other side of the lid to slip through the power chord that attaches to the lamp.
- Attach the lamp to the underside of the lid (see figure above).
- Arrange rocks (optional) underneath the cup of ice.
Before class:
- Apply the defogging liquid to the inside of the aquarium (otherwise, when it gets warm and humid in the terrarium condensation will form on the inside, making it very difficult to view the experiment).
- Turn on the lamp.
- Let it run for ~10 min (or less depending on the strength and position of the lamp).
- If there are enough dust particles (aerosols) in the air, you should start seeing a steady stream of clouds flowing down from the side of the cup of ice and mushrooms of clouds forming over the water. Note: These are clouds of liquid water droplets that form, not water vapor. Water vapor is invisible.
- If you don’t see any of these clouds, then light a match or two, blow it out, and drop it into the terrarium. The smoke from the matches is a good source of aerosols, and that is why we drop the matches into the terrarium.
- If the clouds were not visible, they should show up after introducing some smoke into the terrarium.
- Observe the general circulation inside the terrarium, the evaporation of water from the water surface, the condensation along the outside of the cup, and the melting of the ice.
- If you want, ask why the introduction of smoke particles made the clouds visible.
In class:
Have the students first take a look at what’s going on inside the terrarium.
Suggested plan:
10 min: Have an initial discussion about different forms of heat (energy) transfer
5 min: Have the students look at the terrarium in action. Have them identify the different forms of energy transfer.
20 min: Split up students into smaller groups, hand out the worksheet, and have them fill out the questions to the best of their ability.
20 min: Go over the worksheet with the students, as a class and see what they came up with.
Suggested questions to get students thinking while looking at the terrarium:
- How does the air flow in the terrarium? Where does the air rise and where does the air sink? And why?
- After a while, you may start seeing water droplets along the glass beaker. Where did the water come from? How did it get there? What are the relevant processes called? Is any water gained or lost inside the terrarium?
- Now let’s track the energy in the terrarium. Where does the bulk of the energy come from? Where does it go? Is energy created or lost inside the terrarium?
- When will the temperature inside the terrarium stop rising? – Does the circulation in the terrarium look like any other kind of circulation on Earth?
- Now let’s suppose that we stopped the air from flowing in the terrarium (by putting in a divider, for example). What would happen to the temperature a) by the lamp? b) by the beaker with the ice? And why? What does that tell us about convection?
- Now let’s suppose we took out the water from the terrarium, but still allowed air to flow. What would happen to the difference in temperature between the air by the lamp and the air by the beaker? Would it increase? Decrease? Stay the same? And why? What does that tell us about water and water vapor?
Note: For the questions above, look at the Terrarium Schematic and Answer Key (linked under Materials)
Selected Supplemental Resources
Practical and interesting ways to demonstrate a thermally direct cell (hot fluid rises, cold fluid sinks) and other useful references.
- Lava lamp
- Fill a plastic container with water and keep it up using plastic cups. Then carefully apply dye at the surface, in the middle of the container. Then put a cup filled with hot water underneath the spot of dye and see the water start to rise.
- Get students to participate in a group activity to illustrate the Hadley cell. Use the classroom to represent the Earth, where the length represents the longitude and the width represents altitude. Then have the students to carry cups and get into two rings, representing the two cells of the Hadley cell. Then, put a bucket of water along the ‘surface’ part of the classroom. Then put a bucket where the students can drop the water. Then have the students walk around the room, to represent the flow in the Hadley cell.
- Concentrating on downwelling zones. Similar to the second example, but putting the warm cup of water along the sides of the container to see the downwelling in the middle of the container.
Online resources on geosciences:
Short article on water and water cycle (NASA): http://earthobservatory.nasa.gov/Features/Water/
SERC quantitative skills portal: https://serc.carleton.edu/quantskills/index.html
SERC geosciences: http://serc.carleton.edu/introgeo/index.html
NASA earth observations: http://neo.sci.gsfc.nasa.gov/Search.html
phET simulations: http://phet.colorado.edu/en/simulations/category/new
MERRA winds: http://svs.gsfc.nasa.gov/vis/a000000/a003700/a003733/index.html
