Want to create or adapt books like this? Learn more about how Pressbooks supports open publishing practices.
8 Socket Impression Techniques
Self-Suspension Socket
The design of the socket depends on the patient’s residual limb characteristics and needs, such as limb length and shape, skin condition, medical condition, and the patients priorities and functional goals. Overall, the sockets should achieve the following technical objectives:
Provide self-suspension and a secure purchase with the residual limb
Maximize ROM, but do not loose suspension
Comfortable with resistive forces and throughout ROM
Allow independent donning and doffing
Require a balance of compression between
the triceps bar and the cubital trimline
the mediolateral suspensors
the amount of suspension and the amount of comfort and ROM
Cast Impression Process
Casting Process
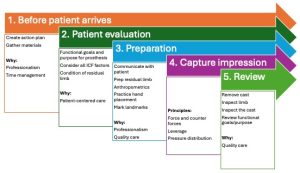
1. Before patient arrives
Create action plan
Prepare and gather materials
Measurement sheet
ML gauge and tape measure
Towels
Cast sock or nylon (double of the nylon to ease doffing)
Yates clamps and elastic webbing
Indelible pencil
Cast scissors and plaster scissors
Container for water
Plaster bandage
Gown
2. Patient evaluation
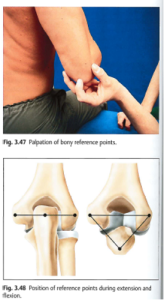
Review ICF factors from Fall quarter. For this socket design, specifically evaluate the shape and movement of the epicondyles through elbow flexion and extension.
3. Preparation
Prepare rigid plaster splint
Make the splint using six (6) layers of 5” rigid plaster
Splint length = circumference around apex of olecranon and cubital fold with elbow at 90 + 8-10cm (3-4”)
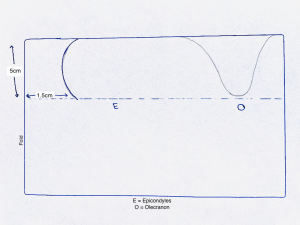
Fold the splint in half and draw the trimlines on the splint.
Height of socket brim: ML trimlines must encompass the epicondyle and flare into the soft tissue. In general:
Children: 2-2.5cm (3/4” to 1”)
Average adults: 3-4.5cm (1 1/4” to 1 3/4”)
Large adults: 5cm (1 3/4” to 2”)
Anterior trimline = cubital fold: about 1.5cm (when splint is folded)
Posterior trimline should encompass the epicondyles and the olecranon
Cut out bandage material to allow room at the cubital fold
Cut out material above the olecranon
Open the splint to full length and wrap it around the limb to ensure it captures the
epicondyles, supracondylar fossa anatomy, triceps bar, and olecranon
Prepare the residual limb for casting
Moisten the casting sock and wring out excess water. Apply the cast sock snugly and use the elastic strap in figure 8 fashion to hold it wrinkle free while the elbow is at 90 degrees.
Avoid bridging in the cubital fossa
Use Vaseline on residual limb if hairy.
Practice hand position
There are multiple options for hand placement depending on the size of your hands, the size of the patient’s limb and the socket design. The next few slides describe three options to position your hands when casting for a transradial self-suspension prosthesis.
Regardless of the hand position you choose, practice it multiple times before laying the plaster until you feel comfortable and confident that you can reliably capture the anatomy.
Assess pressure tolerant areas and potential for suspension.
You want pressure in the supracondylar fossae, on either side of the biceps tendon and on the triceps bar.
A-P Compression between the ante-cubital fold and the triceps bar
M-L Compression at supracondylar fossae: anterior and proximal to the humeral epicondyles
You do NOT want pressure over the bony areas
Check
Alignment
Forearm neutral pronation/supination
Elbow 90’ flexion
Suspension
Donning and doffing
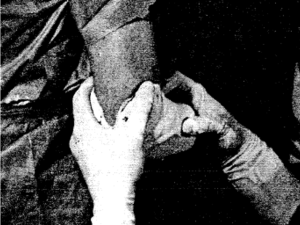
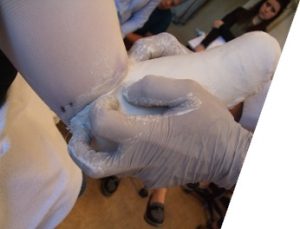
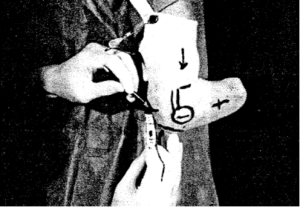
Hand position 1
Place your index and middle fingers on each side of the biceps tendon.
THE FINGER TIPS MUST BE ON THE EDGE OF THE PLASTER WITH THE PADS OF THE FINGERS ON THE CAST SOCK
Place your other hand around the back (or front) of the elbow to maintain snug medio-lateral stabilizers. Hold the stabilizers and “U-shape” of the mold to prevent their spreading. Place your other thumb and middle finger in the supracondylar fossae (anterior and proximal to the humeral epicondyles)
Practice hand position with patient positioned appropriately
Patient position: 1) Elbow at 90 degrees, Neutral pronation/supination and 2) After hand positioned, have patient flex, then extend
Hand position: 1) Index and middle fingers on each side of biceps tendon and 2) Other hand around the back of the elbow to maintain snug mediolateral stabilizers
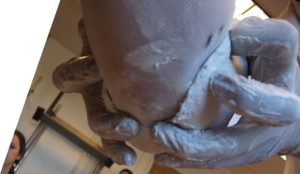
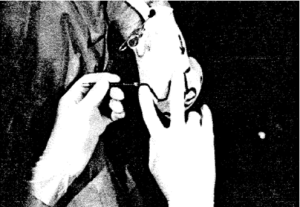
Hand Position 2
Place the hand in front to grasp the supracondylar fossae and the biceps tendon, alternating positions to capture a balanced A-P and M-L grasp.
Place the other hand around the back of the elbow to maintain snug anterior-posterior grasp.
Note
For shorter residual limbs, the Anterior force is directed toward the olecranon to capture more residual limb
For longer residual limbs, the anterior force is directed toward the radius to allow more ROM
Hand position 3
Modified Muenster
Thumbs on either side of biceps tendon
Index fingers in supracondylar fossae
Middle fingers (very light pressure) over supracondylar ridge
Ring fingers or small fingers on the triceps bar
Capture Measurements with elbow at 90’
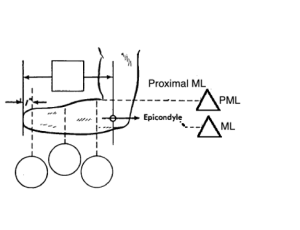
Length and circumferences
ML at epicondyles
Proximal epicondyle ML (PML)
Circumference through the cubital fold and across the apex of the olecranon.
Width of the biceps muscle belly in the cubital fold (3cm)
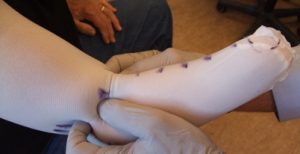
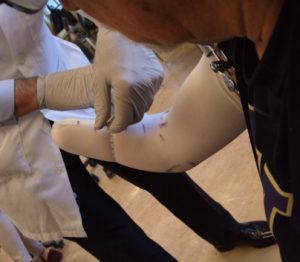
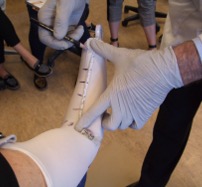
Mark the landmarks and draw trimlines
With elbow at 90 degrees, palpate the following:
Anatomy: cubital fold, epicondyles, biceps tendon and lateral humeral supracondylar ridge, olecranon, and the electrode sites (as relevant).
Place your finger and thumb around the residual limb just above the epicondyles into the supracondylar area. Mark the stockinette just above the level of your finger and thumb. Depending on the anatomy, the line is likely 3 cm (1¼”) proximal to apex of epicondyles.
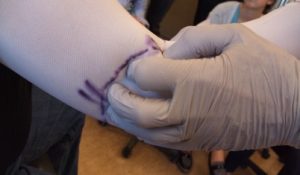
Place your finger along the triceps bar and mark the stockinette just above the level of your finger. This trimline varies based on the residual limb length but is likely about 2.5cm (1”) proximal to proximal edge of olecranon.
Put your fingers on the posterior aspect of each epicondyle. Draw the shape of the brim between your fingers.
Connect the cubital fold line with the medial/lateral marks to complete the brim shape. Be sure to include the supracondylar fossae in the trimlines.
Medial and Lateral Trimlines
Posterior Trimline
Anterior Trimline
Finger width proximal to bony edge of epicondyles.
Encompass the epicondyle at the level of the P-M-L with enough of a brim to flare out of the soft tissue.
Lateral: relief for the humerus in the ROM (“fan relief”)
Standard: 25mm proximal
2.5-5cm proximal to edge of olecranon, capture the triceps bar
Encompass the olecranon
Compress the triceps tendon
Relief for bony pressure on the posterior humeral epicondyles
Medium length limbs: 10mm distal to cubital fold
• short limbs closer to cubital fold
• longer limbs ok to allow room (distal to cubital fold)
Clearance for biceps tendon.
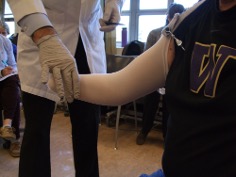
4. Capture the impression
Check
Landmarks and trimlines in appropriate locations and comfort with hand position.
Supplies: Elastic bandage, splint, rigid bandage, distal end splint, scissors, water located under the arm.
Pt knows what to expect.
Alignment
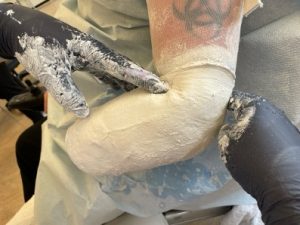
Saturate the rigid plaster splint.
It should be positioned exactly in the cubital fold.
Ensure that the splint covers the epicondyles, supracondylar fossa anatomy, triceps bar, and olecranon
Fold the edge of the wet plaster over to match the trimlines. This fold will increase rigidity of the trimlines.
Avoid extending above the cubital fossa or too high above the olecranon.
Saturate the elastic bandage and place it on the arm.
The first layer should be exactly in the cubital fold and across the olecranon.
Follow your trimlines and palpate as you smooth the plaster to ensure accurate placement.
If using the distal end splint, place this on the limb. (Note, that splints are always rigid plaster and they most often need to be secured with a circumferential layer of plaster.)
Saturate the rigid bandage roll and wrap proximally to anchor down the splint. Continue wrapping distally to cover the distal end.
As you massage, feel the underlying anatomy and the thickness of the plaster.
Massage the plaster to ensure it is not above or below the pre-determined trimlines.
5. Review
Remove the cast:
To ease removing the negative, pull tissue out of the undercut created by the flexion action.
Re-check the condition of the residual limb
Assess the cast impression
Compare ML measurements at epicondyles and just proximal to epicondyles
Inspect the cast:
Is the cast in the correct alignment?
Did you cover all areas with enough plaster?
Do you see the triceps bar?
Is it a finger breadth above the epiconcyles?
Do the inside caliper measurements of the cast match your outside caliper measurements on the patient at epicondyles and supra-epicondyles?
Do your markings match the areas you wanted to highlight, such as the bony prominences?
Review functional goals and purpose with the patient.
Avoid these common errors
Casting too low (not including the ML trimlines).
Casting too high over the olecranon.
Inaccurate limb position (err toward pronation).
Laying the splint down with too much overlap posteriorly.
Lack of knowledge about the limb shape (not taking enough time to memorize the feel of the limb).