5c. Triceps Pad and Humeral Cuff Fabrication
Below-elbow hinges connect the socket to the cuff or pad on the upper arm and are important for suspension and stabilization of the prosthesis on the limb. There are three major types of hinges: flexible, rigid and step-up. The selection depends primarily upon the level of amputation, residual limb condition and the individual’s level of activity.
In this section, you will find directions for fabrication of 1) flexible hinges and triceps pad and 2) humeral cuff for the rigid hinges.[1]
Flexible hinges and triceps pad
The flexible hinges and triceps pad provide suspension to the socket while allowing elbow and forearm motion. Once fitted, the patient should be able obtain 50% of their residual pronation/supination with flexible hinges. Flexible hinges are fitted with a triceps pad, which allows for the attachment and transmission of force for cable operation.
Process to Fabricate and Fit Triceps Pad (8 steps)
1) Fabricate pattern for triceps pad
-
- Gather supplies: paper, scissors, pencil, measurement sheet
- Find the circumferences just above (a) and below (b) the belly of the biceps and the length between them (c).
- Fold a piece of paper in half and mark the length between the circumferences along the fold (c).
- Determine ¼ of the circumferences and mark this spot perpendicular to the fold. Draw the line that connects the two spots.
- Curve the line inside the lines drawn to a pattern similar to the drawing below.
Cut out the pattern
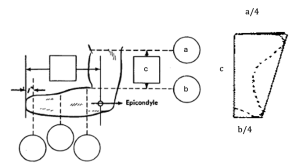
2) Assess triceps paper pattern on patient with elbow at 90’
- Position the cuff pattern on the patient so the proximal edge is at the level of the deltoid insertion and the distal M/L corners lay over the epicondyles, based on pt preference.
- Trim the pattern to allow unrestricted elbow flexion.
3) Fabricate the flexible hinges and cross hanger
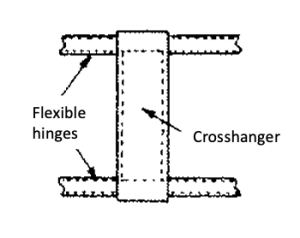 Cut two lengths of ½” Dacron, each a little more than twice the distance from wrist to 3 cm proximal to epicondyle.
- Double the lengths over and sew together
- Flexible hinges may be fabricated from various materials:
- Dacron webbing – lightweight, inexpensive and comfortable
- Leather – may stretch over time
- Cable – durable for heavy-duty use, may add weight and may limit some pronation/supination.
- Sew cross hanger – Cut one length of 1” Dacron, a little more than twice the topographical distance from medial to lateral epicondyle posteriorly with the elbow at 90`. The cross hanger keeps the hinges from bridging the elbow during flexion and maintains the position of the hinges through the axis of the epicondyles.
4) Attach flexible hinges to prosthesis
- Location: 2.5cm proximal to wrist (to allow maximum pronation/supination).
- Burn two holes through the distal ends of each flexible hinge. Fasten the flexible hinges to the prosthesis with cadmium plated No 6 binding head sheet metal screws, using two in each hinge. Make sure that the screws do not penetrate through the inner socket.
5) 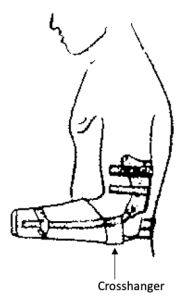 Assess location of hinges relative to elbow joint center
-
- Location: The hinges should extend from just proximal to the wrist unit and attach to the distal corners of the triceps pad. The hinges should pass through the elbow joint center throughout the ROM.
- Pull the two flexible hinges toward the distal end of the prosthesis, with the hinges threaded through the cross hanger. The cross hanger is located at the proximal edge of the socket.
-
- Mark location and tape in place. Assess the position of the hinges as you flex and extend the elbow.
- The line of action of the flexible hinges should go through the epicondyles as the elbow is flexed and extended.
6) Attach hinges to distal cuff
- Location: hinges should travel through level of epicondyles and attach about 1-2 cm proximal to cuff, close to the elbow joint center.
- Mark location and use masking tape to hold the hinges on the cuff in place. Reassess that the line of action of the flexible hinges goes through the epicondyles as the elbow is flexed and extended.
- To attach flexible hinges to leather cuff, punch holes in the leather and rivet the flexible hinges to the triceps cuff.

7) Attach buckles to the proximal anterior edges of the triceps pad for attachment to the inverted-y.
- Avoid any metal contact on the skin by riveting the strap so that the entire buckle lies on the triceps pad.
8) Reassess the location of the cross hanger, then sew the crosshanger to the flexible hinges
*If fabricating the leather triceps cuff:
- Construction of the Leather Triceps Cuff
- Use pencil to draw the pattern onto a piece of strap leather. Cut the leather using a utility blade without lifting blade to prevent edges, or cut with very sharp scissors.
- Attach the crossbar assembly to the center of the leather.
- Cut a similar size of horsehide.
- Place the finished surface of the leathers together and stitch about 5mm below the top edge to form a rolled edge.
- Apply rubber cement to the unfinished surfaces of the leathers. Allow to dry, then stretch the horsehide in all directions and press the two-cemented surfaces together.
- Stitch the two pieces together about 3mm from the edge of the bottom and sides and trim off the excess horsehide.
- Trim and burnish edges of the cuff.
- There are other methods of attaching the straps to the cuff, such as skiving the straps and cuff and inserting the straps between the pieces of leather before stitching the pad together or using buckles.
- After assembly of the leather cuff, recheck alignment on patient, with elbow positioned at 90 degrees.
Finish: Apply two or three coats of leather sealer, such as nylon coating to all leather surfaces to prevent absorption of perspiration and provide scuff-resistance surfaces.
Humeral cuff for the rigid hinges
Rigid hinges and humeral cuff provide stability and protection to the elbow joint and the residual limb. They are often used for short transradial cases where no voluntary pronation or supination is present. They are also used for patients with all levels of transradial amputation who will be lifting heavy loads or involved in activities that create greater than normal forces on the residual limb. The rigid hinges provide resistance to the transverse plane rotational forces that occur between the socket and the residual limb. Additionally, the full cuff provides more protection at the distal end of residual limb by transferring the load from the residual limb to the upper arm, thereby protecting the limb.
Rigid hinges can be fitted with a half humeral cuff or a full cuff. Two types of rigid hinges are available: single pivot and polycentric. The mating gear teeth on the polycentric hinge impart a displacing action to the socket during elbow flexion and provide clearance for bunching of flesh in the cubital fold, a common problem for individuals with fleshy arms.
Note Full Cuff Fabrication: provides maximum protection of the residual limb
- Follow guidelines for fabrication of the half humeral cuff.
- Add an anterior portion to the cuff. This may be fabricated from 1/8” polyethylene.
- Secure fit around upper arm with Velcro or other method.
Process to Fabricate and Fit Humeral Cuff (6 steps)
1) Fabricate pattern for humeral cuff
- Gather supplies: paper, scissors, pencil, measurement sheet
- Fold piece of paper in half
- Find the circumferences at the deltoid insertion and 25mm proximal to olecranon.
- Mark the length between the circumferences along the fold
- Determine ¼ of the circumferences and mark this spot perpendicular to the fold. Draw the line that connects the two spots. This is, approximately, where the hinges will attach.
- Curve the lines to extend the pattern about 2.5cm anterior to the hinge line.
- Cut out the pattern.
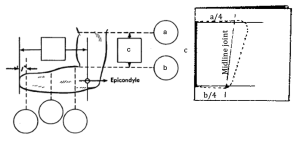
2) Assess humeral cuff paper pattern on patient with elbow at 90’
- Position the cuff pattern on the patient so the proximal edge is at the level of the deltoid insertion and the distal edge is 25mm proximal to olecranon.
- The cuff should extend 25mm anterior to midline of the arm so that the uprights attach at the midline of the arm.
- Trim the pattern to allow unrestricted elbow flexion.
3) Construction of the Humeral Cuff
-
- Use pencil or pen to trace the pattern onto plastic. Trim out and smooth. Form the plastic to the shape of the person’s arm.
- Attach crossbar assembly to the center of the cuff
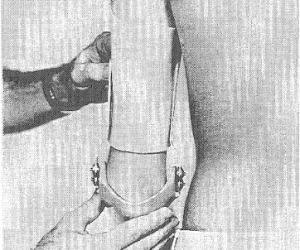
4) Assess location of hinges relative to elbow joint center
|
 |
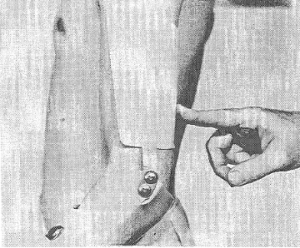
5) Attach hinges to cuff
|
 |
6) Finish: Ensure that all edges and rivets are smooth on the inside and the outside of the cuff.
- http://www.oandplibrary.org/reference/uclamanual/UCLA-11.pdf page 160 ↵
