1 Socket Impression Technique
Think about the following challenges when capturing the impression of the residual limb:
- Smooth cast
- Even/equal amount of plaster coverage – not too thick or thin (50% overlap)
- Good coverage – captured trimlines and distal end
- Alignment
- Elliptical shape
- No finger indentations
Cast Impression Process
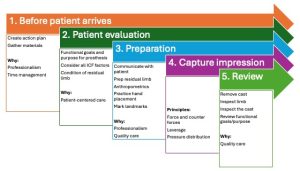
1) Before patient arrives
Prepare and gather materials
Review the challenges to capturing a good impression for your context.
Gather Materials (see list at bottom of page).
2) Patient evaluation
- Initial evaluation interview: What the subject feels, thinks, their personal and functional goals
- Physical evaluation: Test results (Ask the pt if it ok to touch their arm and then perform physical evaluation)
- Screen exam: MMT and ROM
- Residual/affected limb: Skin condition, shape, sensation, palpate surface anatomy, etc.
- Activity performance: Handedness, cognitive ability, posture, and activity performance
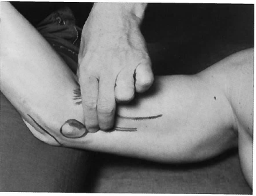
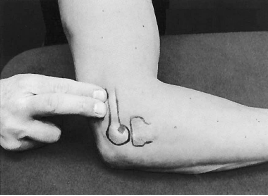
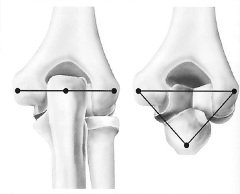
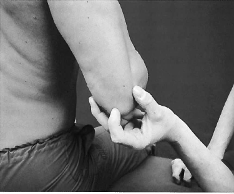
Palpate the bony edges of the medial and lateral epicondyles and olecranon
- Note the close proximity of the head of the radius and the lateral epicondyle.
- Note the supracondylar ridge, laterally.
- Note the relative locations of the epicondyles and olecranon
- Note any tender areas and how the patient feels with the pressure
 |
 |
 |
 |
3) Preparation
3a) Communicate clearly with patient: Talk with the patient about the casting procedure and what you are planning to do.
Describe the casting process to the patient. Instruct the person about what you expect them to do, e.g., relax, and hold their limb in a certain position. Often, you’ll want to capture a certain hand position in your cast, however over the plaster bandage the anatomy feels very different. By asking the person if your hand position before being casted feels the same as when the plaster is in place, you can verify the position of your hand placement and pressure.
3b) Prepare the residual limb for casting
-
- Cover the clothing of the person with a sheet or gown to protect it.
- If limb is hairy, protect with a parting agent such as Vaseline or saran wrap.
- Pull stockinette onto limb, proximal to area being casted.
- Use elastic strap and yates clamps to hold stockinette in place. Avoid wrinkles and gapping in the stockinette which will alter the shape of the impression from the person’s anatomy.
- Mark areas of interest with the indelible pencil, such as bony prominences and neuromas.
3c) Take measurements
-
- Circumferences
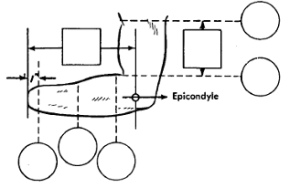
Measurements - Aim for reliable and repeatable measurements.
- Use the apex of the lateral epicondyle as your reference point.
- With the elbow at 80-90’, measure the distance from lateral epicondyle to the location where a full circumference can be measured without interference. Mark this location (easiest if located at solid cm rather than mm, e.g., 5cm).
- Mark locations every 2 or 3 cm from this location.
- Record the semi-snug circumference in the circle on the measurement sheet
- Measure the ML at the epicondyles
- Keep the arm of the ML gauge perpendicular to the residual limb so that you can compare this measurement to the positive cast impression in the lab
- Measure the circumferences and length for the humeral cuff
- 5cm proximal to the lateral epicondyle
- At the deltoid insertion
- The distance between the two circumference measurements
- Measure the contralateral limb
- Circumferences
3d) Practice the hand placement
-
- Consider the following
- Locations of the pressure distribution
- Alignment
- Forearm neutral pronation/supination
- Elbow 80’ flexion
- Donning and doffing
- Position limb in desired position (80 degrees flexion and Forearm positioned midway between pronation and supination … or a functional position)
- Position your hands over the medial/lateral aspects of the residual limb to capture an elliptical shape.
- Ensure the patient is in a relaxed, comfortable position.
- Note any tender areas and how the patient feels with the pressure
- Consider the following
3e) Mark the landmarks and draw trimlines
If needed, place cutting strip from proximal to distal over an area that is either not in the trimlines or over soft tissue.
| Medial Trimline | Lateral Trimline | Posterior Trimline | Anterior Trimline | ||
| Flexible Hinges | Follows a gentle arc to the anterior while allowing maximum supination (ending posterior to the medial epicondyle) | Follows a gentle arc to the anterior while allowing maximum pronation (ending posterior to the lateral epicondyle allowing) |
Encompass the olecranon for protection
|
Cubital fold | |
| Rigid Hinges | Encompasses the medial humeral epicondyle | Encompasses the lateral humeral epicondyle |
3f) Practice the hand placement again
4) Capture the impression
After practicing the hand placement (and, if needed, the cutting strip is in place), apply the cast. Notice that this step occurs after you have assessed the position of the limb, the patient’s understanding of the process and readying all materials.
- Apply the plaster bandage
- Hold the tail of the plaster roll in your fingers as you dunk the plaster in the water. Wet roll thoroughly, but not too wet.
- Wrap by unrolling the plaster roll, maintaining roll close to the limb.
- Place the plaster roll with the same tension at the proximal and distal edges of the roll as it unrolls (possibly by taking tucks).
- Allow 50% overlap
- 4-7 layers of plaster: 2 layers elastic and 3-5 layers rigid.
- Smooth the plaster as you wrap. Be sure to cover all areas with plaster bandage.
- Limb is appropriately aligned. Include in your mold
- Anteriorly to biceps tendon (when flexed to 135’)
- Cover epicondyles
- Olecranon
- Mold elliptical shape, capturing the person’s actual anatomy. Avoid creating shapes that do not exist, such as the shape of your thumb or the palm of your hand.
5) Review
Remove the cast and check condition of the limb
- Clean the client’s limb and check the skin for any signs of irritation.
Inspect the cast
- Did you cover all areas with enough plaster?
- Do your markings match the areas you wanted to highlight, such as the bony prominences?
- Is the cast in the correct alignment?
- Do the inside caliper measurements match your outside caliper measurements?
Describe next steps
- Provide information about the next appointment. Ask client if they have other questions.
Prepare positive model
-
- Remark indelible pencils markings inside the cast. Seal and extend cast if necessary. Spray inside of cast with a parting agent such as diluted soapy water or baby power. Determine appropriate pipe to use.
- Fill cast and place pipe in desired alignment position.
- Transfer alignment lines to the positive cast then strip cast and redraw all markings.
List of Materials for Casting
- ULP evaluation form
- Measurement form
- Flexible tape measure
- ML gauge
- Goniometer
- Color swatches
- Sensory tester
- Sheet/ towels
- Gown
- Paper to cover floor
- Gloves
- Vaseline/skin parting agent/ or Syran wrap
- Cutting strips
- Casting sock (sewn cotton stockinette sock)
- Long elastic strap to hold sock in place
- 2 Yates clamps to attach elastic to sock
- Cast marking indelible pencils
- Water bucket with plastic liner
- Elastic plaster bandage (4 “ orthoflex)
- Rigid plaster bandage (4 “ specialist)
