
5 Prepare for Lamination
Preparation
- Prepare sockets to be filled – see separate set of instructions below for Flexible hinges and Rigid hinges.
- After the plaster has set remove the skirt and remove the PETG carefully to preserve the shape of the model.
- Reassess the shape of the model and redraw trimlines
- Complete plaster modifications, such as the following:
- Smooth transitions between socket wall and pads
- Add reliefs if indicated
- Add reverse flare at cubital fossa and posterior olecranon – These will provide relief at edges of socket as patient extends/flexes their arm. Additionally, you will use these to identify the trimlines after the lamination is complete.
- Remove all sharp edges proximal to the trimlines to avoid areas that may cut the PVA bag.
- Ensure the hole in the pipe is accessible – it must be above the sleeve assembly with clear airway to bottom of pipe. You may apply a parting agent such as cellulose acetate.
Flexible hinges
- Record length/alignment and remove forearm extension. Keep the PVC pipe, wrist and TD for use at the next appointment.
- Remark todo modifications on the inside of the socket with black sharpie (these will transfer to the plaster mold).
- Seal holes and skirt/extend socket with tape. Use duct tape to skirt socket 7-10 cm proximal to your ideal proximal trimlines. Ensure that the proximal edge of the duct tape is perpendicular to the pipe.
- Fill socket with plaster and modify.
Rigid hinges
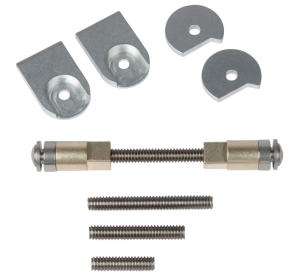
Use the elbow hinge spacer to align the elbow joints. Notice the parallel surfaces of the faces of the brass spacer (outside surfaces). After filling the socket with plaster, you will match these surfaces with the inside flat edge of the rigid joints. Follow the following steps:
- Gather materials
- Test socket
- sharpy
- elbow hinge spacer (includes a 1/4″-20 screw)
- Hand drill and drill bits: #19 and 1/2″
- #8-32 x 1/4″ round head screws
- 1/8″ crepe
- vaseline
- duct tape
- plaster
- After lamination: joints, #8-32 x 3/8″ flat head screws, and epoxy, and 4 ea #8-32 combo screw and wing nuts.
- Remove the PVC pipe from your test socket. Keep the PVC pipe, wrist and TD for use at the next appointment.
- Remark todo modifications on the inside of the socket with black sharpie (these will transfer to the plaster mold).
- Double check the alignment by placing your fingers on the joint center and looking at their alignment.
- Drill a pilot hole at the elbow joint center with a size #19. The wall of the check socket is usually on an angle to the face of the spacer. When drilling, the bit should be directed toward the opposite hole.
- Determine the elbow joint clearance.
- The finished device should have 2-3 mm clearance between each epicondyle and the corresponding metal joint when elbow is flexed 90 degrees. In the presence of fleshy residual limbs, the metal should not touch the skin.
- Adjust the spacer to the length between the faces of the brass spacer matches this final diameter. You will use the face of the brass spacer (flat ends) to square your joints after filling the socket with plaster.
-
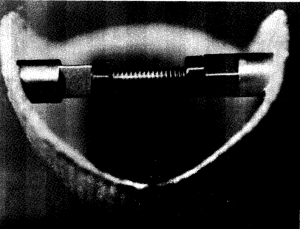
Hinge spacer in socket Check the fit of the elbow hinge spacer in the socket.
- If the spacer will fit through both sides of the socket (ideal), drill a ½” drill bit to fit the spacer through the socket.
- If the spacer is not long enough to fit through the socket, place the screws through the pilot holes to secure the spacer in place.
- The spacer must be secured in the socket before filling with plaster.
- Cover the spacer with lots of Vaseline, a parting agent to help you remove it from the mold later.
- Use duct tape to skirt socket 3 cm proximal to the proximal edge of the joint spacer. Ensure that the proximal edge of the duct tape is perpendicular to the pipe.
- Fill socket with plaster.
- Remove PETG. Place the #8-32 x 3/8″ round head screws through 1/8” hard foam (e.g., crepe) the diameter of the elbow hinge spacer and screw them into the nuts. You will use this bump to find the joint center after the lamination.
- Caution: do not over-tighten the screws.
- Modify mold
- Put clay over the screws to protect them. You will use the shoe machine to grind into the lamination. We don’t want to grind (too much) into the screw.