2 Cast Modifications
Purpose
We modify the positive model to prepare it for test socket fabrication and aim to:
- Capture stability of residual limb with as much comfort as possible
- Relieve bony areas
- Compress soft tissues
Cast Modification Process
- Preparation
- Gather tools/materials: surform, utility knife, plaster bowl, regular screwdriver, and measurements of residual limb
- Assess shape of model
- Remark bony prominences
- Compare the length and M/L measurements on your model with the prosthetic measurement form.
- Draw the trimlines
-
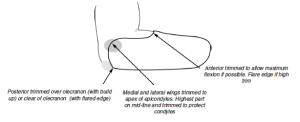
Medial Trimline Lateral Trimline Posterior Trimline Anterior Trimline Flexible Hinges Follows a gentle arc to the anterior while allowing maximum supination (ending posterior to the medial epicondyle) Follows a gentle arc to the anterior while allowing maximum pronation (ending posterior to the lateral epicondyle allowing) Encompass the olecranon for protection
Cubital fold Rigid Hinges Encompasses the medial humeral epicondyle Encompasses the lateral humeral epicondyle
- Removal of plaster:
- With surform, slightly flatten and flare the anterior-proximal area of the model to provide total surface contact between the limb and the socket. Remove only enough to conform to the circumference measurements.
- Buildups with plaster:
- do not make a sharp point on the buildups. Follow the shape of the bones and consider how the bone changes shape through elbow ROM. You may use a tack or a staple to gauge the correct distance for the buildups.

Olecranon modification - Add plaster:
- 3mm over styloids, if present
- 6mm distally
- directly distal
- anterior distal
- other bony projections
- 6-10mm over olecranon at a 45’ angle.
- Cover the full medio-lateral width of the olecranon maintaining its natural contour. Notice how the olecranon changes it proximal-distal shape as the elbow flexes and extends. The most proximal-posterior portion of the socket should fit into the triceps tendon (triceps bar) when the elbow is fully extended.
- 6mm medial epicondyle
- 3mm lateral epicondyle. Consider the prominence of your patient’s supracondylar ridge.
- Proximal to epicondyles to allow donning/doffing
- do not make a sharp point on the buildups. Follow the shape of the bones and consider how the bone changes shape through elbow ROM. You may use a tack or a staple to gauge the correct distance for the buildups.
- Reassess the shape of the model and smooth plaster
- Assess the load bearing areas and the non-load bearing areas
- Assess the model of smooth transitions between the load bearing and non-load bearing areas
- Ensure the size and shape matches the size and shape of the patient’s residual limb
- Smooth/polish the model
- Smooth the model with sanding screen to remove irregularities.
- Draw trimlines again.
- If a window is needed to accommodate a bulbous end, measure the width of the styloids on the model with calipers. Set the calipers at this width then move them proximally until the same width is reached. The window will extend between the two widest areas of the model.

