4 Evaluation of Socket Fit
Purpose of test socket evaluation
The socket should be comfortable with and without loads applied in all ranges of motion.
- We use the test socket to ensure that the socket provides a solid purchase, which distributes pressure over large areas of soft tissue and relieves bony prominences.
The upper limb prosthetic socket provides six distinct purposes: it provides a solid purchase on the residual limb; it extends control function for the individual; it provides fixation of components; it provides for movement and direction; it transmits force and displacement of the components; and it provides a source of energy and excursion.
Test Socket Evaluation Process
Step 1: Before donning socket
- Evaluate the residual limb (skin, shape, muscle tone, soft tissue, bony/sensitive areas, volume)
- Measure circumferences again
- Measures elbow joint ROM without the socket in place.
Step 2: Don socket, then check
- Tissue fit and anatomical landmarks
- Locations of anatomical landmarks: biceps tendon, epicondyles, olecranon
- Overall fit – location of total contact
- Trimlines (continue to check throughout the process)
- Trimlines, ROM and Stability
- Evaluate the movement of the skeleton inside the socket and comfort against resistance. “Stick in jello”’
- Assess all planes of motion while applying resistive force. Observe areas of pressure distribution. Where are the areas of compression? What does the skin look like? Does the socket move relative to the bony anatomy?
- Consider how the weight of components will affect the fit and stability
- Consider the stability of the socket in the positions that the person will use the prosthesis (e.g., if riding a bike, then the shoulder is slightly extended
- Measure elbow joint ROM with socket in place.

Socket Stability Test
- Evaluate the movement of the skeleton inside the socket and comfort against resistance. “Stick in jello”’
Step 3: Adjust the socket fit based on your assessment
Areas of isolated skin discoloration need to be adjusted. There are two methods to adjust the fit of the socket: heating the area out OR by padding the surrounding area. But, how do you decide when to use one method over the other? The answer is based on the overall fit of the socket. Consider these questions to figure out which method to use:
- How snug is the fit of the socket? Is there room in the socket? – if room in the socket, add a pad.
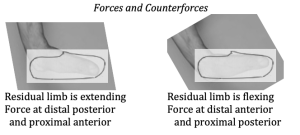
- Are the areas of skin discoloration related – are they force and counterforce to each other? – Maybe add a pad.
- Is the area of skin discoloration isolated to that one location and the socket otherwise snug? – Heat relieve
- Aim to evenly distribute the pressure over the soft tissue or long bones.
| Heat modify the socket | Add a pad to the socket |
|
|
