3 Test Socket Fabrication
After completing the modification process, you will fabricate your test socket. The purpose of the test socket is to evaluate the fit and comfort of the socket on the residual limb.
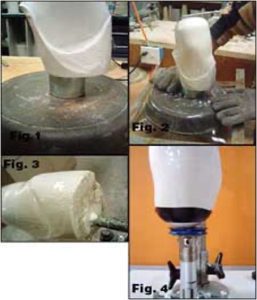
Test socket fabrication over a positive model is a multi-stage process including the following:
- Vacuum forming – requires the use of the oven, oven gloves, compressor, vacuum station
- Breaking out the mold – requires the use of a cast saw, ball peen hammer, plastic hammer, and often a long screwdriver or chisel
- Smoothing the plastic – requires the use of the shoe machine, Trautman, sand paper, and torch.

1. Vacuum form plastic over the positive model
Vacuum forming plastic is a process used to fabricate test sockets and other plastic devices in prosthetics and orthotics. Vacuum forming may be used with various types and thicknesses of thermoplastics. The various types of thermoplastics are chosen depend on their material properties and the flexural rigidity and durability needs for the device. Common plastics used in P&O are LDPE (low density polyethylene), HDPE (high density polyethylene), PP (polypropylene), Copolyer, Surlyn, Durrplex, Proflex with Silicone, Subortholene, Pelite and Plastizote.
- Preparation
- Oven
- Turn on oven and/or check temperature
- Do not use anything but a dry cloth to wipe off the oven tray.
- Always wear dry gloves and forearm protection while working with hot materials.
- Vacuum system
- Check the gauge. If using a platen, check for air leaks.
- Setup mold and plastic
- The bottom of the mold should sit flush against the top of the platen.
- Secure the plastic in the frame.
- * Trimlines should be clearly marked.
- Oven
- The prepared plastic sheet is heated in the oven at a pre-specified temperature.
- Once the plastic has reached it’s melting point, the plastic is then draped or pulled over the positive mold using vacuum suction. Care must be taken to avoid wrinkles and imperfections.
- At the end of the day, turn off the oven and the compressor and return all gloves, tools, and frames to their storage locations.
2. Break out the plaster from the plastic
- Retrace your trimlines on the outside of the socket with a sharpie marker.
- Use a cast saw to cut along the trimlines. Do not leave ANY sharp edges or cuts towards the socket; these stress concentrations often lead to a larger crack in the plastic as you bang on the pipe or socket.
- To break out the plaster out of the plastic, use a ball peen hammer to hit the pipe while holding the model. Do NOT hit the pipe while the pipe is in the pipe vice (it will break the pipe vice). You may also hit the plastic with a plastic hammer, but ONLY hit the plastic that is backed by plaster. If you hit the plastic without plaster on the other side, you will likely break the plastic. The purpose is to create impact on the plaster and break the plaster into pieces.

3. Smooth the plastic
- Double check your trimlines
- Use the shoe machine or the coarse Trautman cone to shape the plastic to the desired trimlines. Aim for smooth lines.
- Use the fine Trautman cones to create a bevel at the trimline and remove rough edges.
- Use the green arbor to smooth the plastic
- With fine sandpaper, use back-and-forth motions with the same pressure levels to create an even finish.
In solid mechanics, a stress concentration (also called a stress raiser or a stress riser or notch sensitivity) is a location in an object where the stress is significantly greater than the surrounding region.
