
14 Evaluation of Socket Fit
1. Before donning the socket
Condition of the residual limb
- If relevant, changes in skin, shape, muscle tone, soft tissue, bony/sensitive areas since the last visit.
- Limb circumferences (use table format)
- Skin condition
- Prior to fitting:
- After fitting:
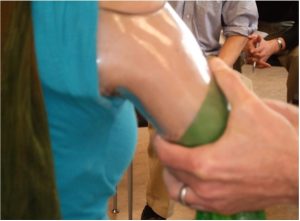
2. Don socket
| Use baby powder during the test socket fitting to ease donning and protect the skin. |  |
| Place the donning sock over the residual limb to pull the tissue into the socket. |  |
| Press up while the pt pushes down. Pull portions of the donning sock to gradually pull the pts tissue into the socket. | 
|
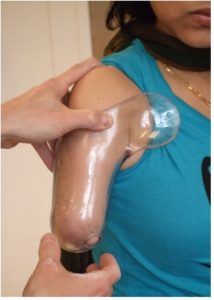
3. Check fit[1]
- 3a) Overall Fit and Function: Initial impression of socket fit, anatomical landmarks, total contact, trimlines.
- 3b) Suction/Suspension: Initial trial of suction.
- 3c) Range of Motion / Stability: No restriction of motion and good translation of motion to socket
3a) Overall Fit and Function: Initial impression of socket fit, anatomical landmarks, total contact, trimlines.
|
 |
3b) Suction/Suspension: Initial trial of suction. This will be tested again once harness and componentry are attached.
|
 |
3c) Range of Motion / Stability: No restriction of motion and good translation of motion to socket
|
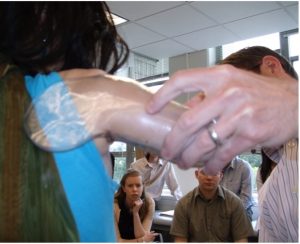
Check for gapping and blanching through ROM. |
4. Check length and alignment
Alignment: Mark vertical lines on the test socket to determine placement of turntable. The turntable should be vertical in both frontal and sagittal planes
- To draw the alignment lines, position the test socket on the patient’s limb and position the limb in neutral alignment. The humerus should be aligned vertically, neutral flexion/extension, abduction/adduction and neutral internal/external rotation (the patient’s comfortable carrying angle).
- Drop the plumb line from the lateral aspect and draw a vertical line.
- Draw a second line from the posterior (or anterior). Measure the horizontal distance from this line to the lateral aspect of the patient’s hip.
- Eventually, you will use these lines to capture the pre-flexion angle and the clearance for the hip in the final prosthesis.
- Measure the distance between the acromion and the 10 cm hatch mark on the socket.
- You will use this mark to determine the position of the elbow joint.
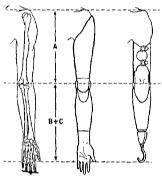
- Humeral length
- acromion to lateral epicondle = acromion to center of elbow axis
- acromium to distal end of forearm, when elbow is flexed to 90’
- Forearm length
- lateral epicondyle or olecranon to distal thumb in a relaxed position = lateral epicondyle or olecranon (or elbow joint center) to distal end of TD
- Functional length – this may be shorter than the patient’s contralateral limb or shorter than the result from the Carlyle index. It may be a length that most easily allows the person to reach their mouth with the prosthesis.
- For someone with bilateral limb loss, you may use the Carlyle formula
- Humeral length (AC to lateral epicondyle) = 0.19 times body height
- Forearm length (lateral epicondyle to thump tip) = 0.21 times body height
- Be sure to consider clearance for components
5. Revisit functional goals/purpose of prosthesis
- Written by MacJulian Lang, CPO, Clinical Director at Advanced Arm Dynamics, NW ↵