
43 Plastic Removal
PPE
- Eye and ear protection, mask and gloves.
- Close toe shoes should be worn in all lab areas.
General Technique Tips
Cooling time: When to cut off plastic?
Semi-crystalline plastic (e.g., PP, PE, and CP) is ready to be removed from the model when it reaches it’s Set Temperature or after cooling for 6 or more hours. Whereas, amorphous plastic (e.g., PETG) may be removed once the plastic temperature is cool to touch.
Why? A slower cooling rate reduces shrinkage. Semi-crystalline materials become amorphous in their molten state and subsequently re-crystallize upon cooling.
Furthermore, rapid cooling of semicrystalline plastics with compressed air (i.e., quenching) ‘freezes’ molecules in a more amorphous state and creates internal stresses and uneven crystallization patterns that could lead to weak points or areas prone to failure. (Quenching would not have the same effect with amorphous materials such as PETG.) Controlled cooling allows for more uniform crystallization and better material properties.
Preparation

Before making any cuts, visually inspect the plastic to identify stress risers: Look for cracks, cuts, notches, sharp corners, folds in the plastic (creased during thermoforming) or sudden changes in geometry. If you find any stress risers within the trimlines, drill a hole (~1/8”) at the end of the stress riser. The hole essentially changes the geometry from a sharp point (i.e., high stress concentration) to a smooth, rounded feature and creates a broader area to distribute the stress rather than concentrated at a single point.
Consider the material properties (PETG and polypropylene are highly notch sensitive) and the geometry of the structure (orthoses are often open, while sockets are closed).
Socket
-
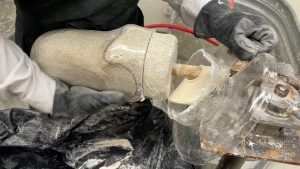
Image 1. Remove excess material Remove proximal excess plastic
- It is often helpful to remove the proximal excess plastic first by a circumferential cut. If the plastic is too broad to fit into the bench pipe vice, place the model on a secure surface and cut close to the top of the model to remove the excess plastic (Image 1). Removal of the proximal excess plastic makes it easier to stabilize the model in the vice before cutting to trimlines.
- Cut the plastic to ~1/4” of the trimlines
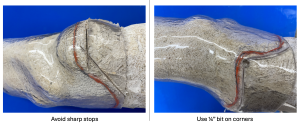
- Avoid creating stress concentrations with the blade around curves. For transtibial sockets, it is often helpful to drill ¼” holes just proximal to the indentations at the hamstring tendons and proximal to the lowest part of the PTB trimline. This can help reduce notches in these areas from cast saw cuts (Image 2). PETG is highly notch sensitive.
-
- Once trimlines are cut, it is time for “breaking out” which tends to be where material fracture occurs most. There are various methods to break the plaster out of the model.
- Hammering along the length of the pipe sends impact force through the pipe and to the brittle plaster. Chisels are used to directly impact and break up the plaster. That impact force is also translated to the plastic. Any stress risers in the plastic will experience the impact at higher magnitudes and potentially expand.
- Pneumatic chisels can speed up the process and require extreme caution during use. They increase the debris that may cause damage to eyes and skin and create rapid impacts that can potentially fracture the plastic itself. Care must be taken to not place the chisel too close to the wall of the socket.
- A rubber mallet can be used to strike the outside of the socket. Never hit the edges of the socket or areas that would create isolated areas of impact.
- If the model is cylindrical and has no undercuts, the plastic can be hit off with a hammer and wood, or be blown off with compressed air. The benefit of this method is that the positive model can be saved. However, this must be performed with extreme caution as plastic can easily fracture and built-up air pressure can be very dangerous. Avoid standing in front of a socket if using compressed air to force the socket off as it could suddenly pop off the positive model and cause personal injury.Break the plaster out of the socket
AFO or KAFO
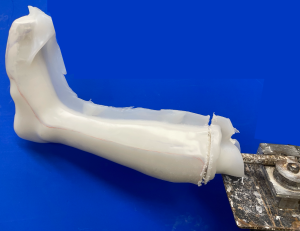
- The first cut on an AFO or KAFO should be made perpendicular to the long axis of the model (Image 3). Specifically, this means making a full circumferential cut around the proximal part of the model before cutting along the longitudinal axis.
- Why: Thermoforming plastic over a model creates residual tensile stresses – stresses that remain in a solid material after the original cause of the stresses has been removed. Cutting circumferentially around the top of the model relieves the stresses in the longitudinal direction, thus reducing much of the internal stress. Residual stresses also play a role in thermoplastic warpage, or spread, after making the longitudinal cut.
- Potential consequences: If the first cut is parallel to the length of the model (before relieving some of the residual stress), the cast saw will create a stress riser which can lead to a stress crack down the model.
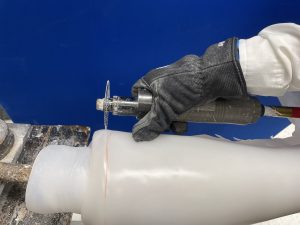
Hold the cast saw near the blade, close enough to maintain control while still being able to operate the trigger lever (if present). This grip improves precision and stability and allows you to use your thumb on the model for added support (Image 4). With small hands, one can hold the cast saw with two hands, but always stabilize the saw with the hand, thumb, or wrist as shown in the video. Avoid free-handling the cast saw to keep the saw from slipping and damaging the device.
Make short cuts – once through the material, lift the blade out before moving to the next cut. Avoid dragging the blade continuously through the material because this can overheat the plastic, which can cause it to melt and adhere to the blade.
Cut the plastic to ~1/4” of the trimlines
| Best Practices | Practices to Avoid |
|
|
"Free-handling a tool" refers to using a tool without properly securing/stabilizing the workpiece or using it in an unrestrained, unsafe manner. Free-handling dramatically increases the risk of kickback, slipping, injury, and damaging the device.