
41 Bubble Forming
Thermoforming is a common practice in P&O to fabricate test sockets, flexible sockets, orthoses, and other products. It may be used with various types and thicknesses of thermoplastic sheets.
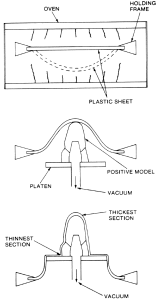
- Bubble forming (i.e., blister forming) is one method of thermoforming. Amorphous plastics are particularly well-suited for bubble forming because they soften gradually due to the glass transition temperature (Tg).
PPE
- Always wear dry gloves and forearm protection while working with hot materials.
- Close toe shoes should be worn in all lab areas.
General Technique Tips
Preparation
- Turn on oven and check oven temperature: Melting temperatures vary by type of plastic. The manufacturer’s recommended thermoforming temperature for each plastic (noted in the SDS) is recorded in our “thermoforming” notebook in the black cabinet. Check for the appropriate temperature and set the oven temperature to match. Beware that overheating plastic may cause some plastics to release fumes that may be harmful.
- Turn on/check vacuum pressure at the gauge located on the center post of the thermoforming station: for polypropylene, polyethylene, PETG and Kydex, a low vacuum of about 20 in. Hg. is satisfactory.
- Double check vacuum by placing your hand (thenar or hypothenar eminence) over the hole in the platten, then turn on the platten.
- Set plastic in frames (use frames with same color or same hatch marks, place color/hatches on same corner and outside plastic.) Lightly soap edges of frame. Attach bolts so that the threaded part applies a clamp-up force on plastic.
-
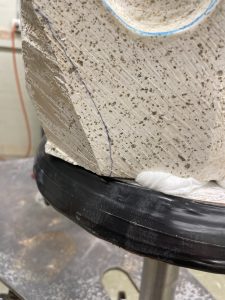
Model extending over platen. Plaster must be removed to allow plastic to bond to the top of the platen. Make sure the positive model is securely positioned on the platen
- Use stockinette to fill gaps where plastic can get sucked in and pop.
- Ensure that there are no sharp edges in plaster modifications that might rip the plastic.
- Ensure the the model does NOT extend past the edge of the platen.
- Ensure the work area is clear of obstacles.
- Locate and ensure you are familiar with the operation of the vacuum lever.
- Have additional tools accessible and ready for use, e.g., scissors, utility blade.
- Consider potential problems:
- To avoid plastic from landing on the lightbulbs below – do not leave the room when the plastic is in the oven and keep a close eye on the plastic while it is in the oven.
- Loss of suction – always have clay available to plug holes.
- No suction – always check your suction.
- Plastic too elastic – if draping, allow it to cool slightly before pulling it off the tray.
Bubble Form
- Place plastic in oven
- Predict potential problems
- Prep with your partner
- After plastic has drooped 1/2-3/4 length of model (10-15 min), pull it out of the oven and place over the model, as illustrated.
- For arms, the model is typically narrow and long predisposing the finished product to vertical wrinkles and uneven plastic thickness. To avoid these issues, pre-form the heated plastic by creating a narrow droop. To do this, after the plastic has drooped about 50% of the length of the model, open the oven door and press down in the center of the model with one or two fingers.
- Gently pull frame just past the wood platen, no more than 2 cm.
- *To avoid wrinkles and get good vacuum, ensure:
- seal on the platen or around the pipe
- plastic touches model
- Slowly turn on the vacuum
When complete
- Store all gloves and frames properly.
- Turn off the oven and the compressor.
Additional resources