
37 Adhesives, Solvents, Resins
PPE
- Use protective gloves
- Use safety glasses
- Use your personal respirator
- Close toe shoes should be worn in all lab areas
General Guidelines
- Glues and thinners:
- are stored tightly closed in the flammable cabinet.
- should be kept away from heat or flames.
- If the container is empty, inform the instructor.
- Clean work surface after use.
- Store in a fire cabinet, in the room, in original packaging, with the lid tightly secured, when not in use.
- Handle open containers with care.
- When using, do not eat, drink or smoke.
- Avoid contact with eyes and skin.
- Use only in a well-ventilated area. Avoid breathing dust/fume/gas/mist/vapors/spray.
- Do not swallow.
- Find the Standard Operating Procedures and Safety Data Sheets on Canvas Commons
Precautions In case of:
| Skin Contact | Wash with soap and water |
| Eye contact | Flush with large amounts of water with the eye wash apparatus for at least 15 minutes (prior to using the eye wash, let the water run for a few seconds), seek medical attention. |
| Vapor inhalation | Get to fresh air, restore breathing, seek medical attention. |
| Spill | Contain the spill. |
General Technique Tips
Follow these instructions when working with adhesives and resins.
- Prepare the surfaces
- Ensure congruency between surfaces to avoid gaps
- Sometimes it is important to rough the surface. A rough surface for bonding often leads to stronger bonds because there is more surface area on material and more mechanical interlocking.
- Clean the surface
- “Surface energy is a physical property of the surface of a material that determines whether an adhesive will make intimate contact. On a material with high surface energy, a liquid will wet out or spread out on the surface; on a material with low surface energy, the liquid will resist flowing and bead up. An adhesive must wet out the substrate to provide a bond.” (https://www.3m.com/3M/en_US/bonding-and-assembly-us/applications/material-bonding/).
- Select the appropriate adhesive. Consider the following characteristics:
- Compatibility: Type of surface to be joined, e.g., metal, plastic, foam
- Mechanical properties
- Strength of bond: Tensile, shear, peel strength
- Flexibility/stiffness of bond: Brittle (can fail with impact loads) or ductile (can handle vibration, expansion, compression)
- Dissimilar materials (metal to crepe) often have different expansion rates – flexible bonds accommodate this
- Impact resistance and toughness
- Physical characteristics
- Appearance, color, odor, toxicity
- Viscosity: very low viscosity glues are useful to penetrate tight bonds quickly, whereas medium or high viscosity are useful when you want the glue to stay in place while it cures to shape and fill gaps between surfaces.
- Performance
- Reworkability and repairability
- Apply the adhesive
- Spread the adhesive uniformly
- Avoid gaps between surfaces
- Adhesive should be free of gels (partially set sections)
- Use proper ventilation
- Reasons for failed bonds may include coating too think, bonding too soon, and/or not enough compression of surfaces.
| Adhesive[1] | Base | Components | Application | How Cured | Cure Time | Strength of Bond | Viscosity |
| Barge (All purpose cement) | Neoprene base | 1 part liquid | Apply a thin coat with brush | Air cured (solvent evaporation) | 20-30 min | Strong and tough/firm | Low |
| Cat’s Paw Rubber Cement | Rubber | 1 part liquid | Apply a thin coat with brush | Air cured (solvent evaporation) | 2-5 min | Weak and flexible | Low |
|
PLUSERIES 60 Second Curative |
Urethane | 2 part liquid | Apply with applicator gun and tongue depressor | Chemical reaction (addition polymerization) between resin and hardener | 3 min | Very strong and structural | Medium |
| Silicone adhesive | Silicone | 1 part liquid | Apply a thin coat with tongue depressor | Chemical reaction (vulcanizing) initiated by moisture in the air (condensation) | varies | Moderate strength and flexible/elastic | Low |
| Super glue | Cyanoacrylate – a family of fast-acting acrylic resins | 1 part liquid | Applied directly from tube or bottle to clean, close-fitting surfaces | Chemical reaction (polymerization triggered by hydroxide ions) initiated by moisture | seconds | Very strong and brittle | Very low |
Special instructions for Contact Cements: Barge cement and Polyadhesive
Contact cement is a synthetic rubber adhesive that is applied to two corresponding surfaces and allowed to dry before joining to create an instant, permanent bond. Unlike other adhesives, contact cement must dry completely before workpieces are brought together.
- After preparing and cleaning the surfaces, assess the contact cement. For the most successful application, the glue should be of medium consistency to be applied with a consistent layer. If necessary, the barge cement can be thinned using addition of barge thinner to the cement. Mix with a disposable tongue blade found in the flammable cabinet.
- Apply to the glue to the two mating surfaces.
- Allowed to dry and get tacky (~5 min). Apply a second coat if you want a stronger bond.
- Position the pieces correctly and press the pieces together for a solid bond. Avoid pockets of air.
- After use, secure the cap on the container tightly. If the cap is not secured, air will enter the container allowing the thinners to evaporate and the glue to harden rendering it useless.
Special instructions for PLUSERIES 60 Second Curative (see video below):
 After preparing and cleaning the surfaces, prepare to use the applicator gun:
- If using a new cartridge
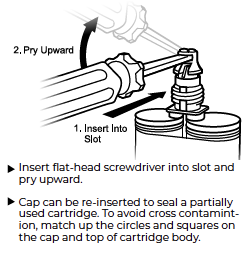
- Remove the cap of the adhesive cartridge by twisting and pulling off for the 50ml size. On the 215ml cartridge pry the uppermost slot with a flat driver (see image to right).
- Properly place the cartridge into the gun. Prior to attaching the mixing tip, dispense a small amount of adhesive to ensure both sides flow evenly. If the both sides do not flow evenly, using a small poker carefully enlarge the restricted side to ensure full flow.
- Attach mixing tip by locking tabs on the 50ml size or screwing on for the 215ml
- If using the same cartridge
- Ensure that pressure on the metal tab located on the back of the applicator gun is released
- Replace the old mixing tip with a new mixing tip
- If using a new cartridge
- Apply a generous amount of +PLUSeries adhesive
- Release the pressure on the metal tab located on the back of the applicator gun. This will allow you to easily remove the tip for your next use.
- Leave tip on the cartridge to act as a cap.
- Assemble with the mating part within the recommended working time.
- Allow adhesive to cure per recommendation.
- Sand and buff using industry standard tools.
- Special Note: In any application involving weight bearing we recommend a minimum cure time of 15-minutes and additional reinforcement such as fiberglass cast wrap.
- Link to Fabtech adhesives and resins
Recommended Applications:
- Plastics: Acrylics, Styrenics, Vinyl Esters, Urethanes, PETG, Epoxy, Polyesters
- Composite Fibers, Fiberglass
- Metals: Aluminum, Carbon, Steel
- Wood, CAD Foams, Dry Plaster
Non-recommended Applications: Polypropylene, Polyethylene, Copolyesters
Clean Up:
- Use a solvent such as acetone before the adhesive cures.
- For cured adhesive carefully scrape it off.
- Large spills of un-cured material should be cleaned up with an absorbent material and disposed of following your local policies for chemical disposal.
- Orthotic Shop Manual ↵