Interviews Folder
Annotating Interview Videos
Review All Annotation Tools
Before beginning annotation:
- Read through the annotation process completely. The process is outlined in this chapter.
- Review the description templates.
- Ensure you are using the most up-to-date Multimedia Resource Glossary, and refer to it often.
- Review the handbook’s Overview section for more informaton about produced media and general tips.
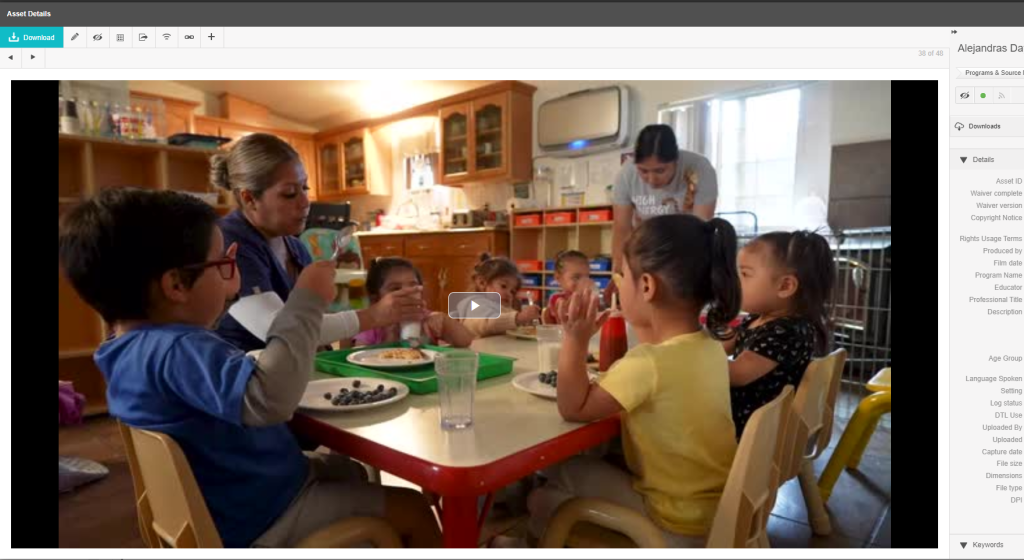
Select the asset, then click the arrow to play the video.
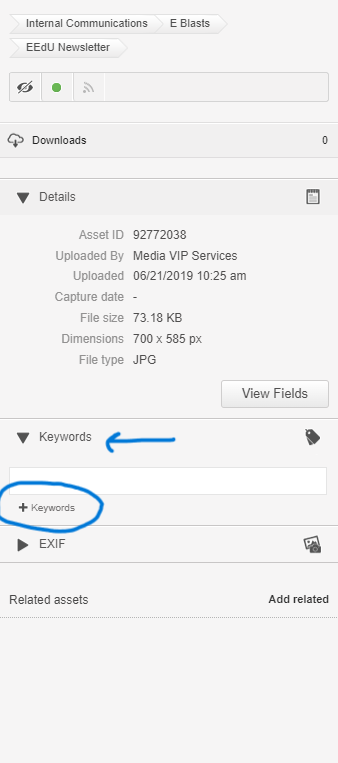
Add Keywords
- Review the Multimedia Resource Glossary.
- Select as many as apply and are relevant.
- Remember, keywords are used to search for specific content.
- Be careful to select keywords of teaching practices and content that are evident in the interview.
- If an interview is discussing a teaching practice or other content, that should be indicated in the description, not the keywords.
- If am interview video includes video clips demonstrating specific teaching practices or other content, that would also be added as a keyword.
- Consider: Could this interview video be used in products to illustrate the content or teaching practice you have tagged it with?
- Do not deselect “parent words” from keywords.
- Use only the Keyword drop-down choices. Do not write-in any keywords.
Directions:
Select the +Keyword feature at the bottom of the metadata fields on the right side of your device screen.
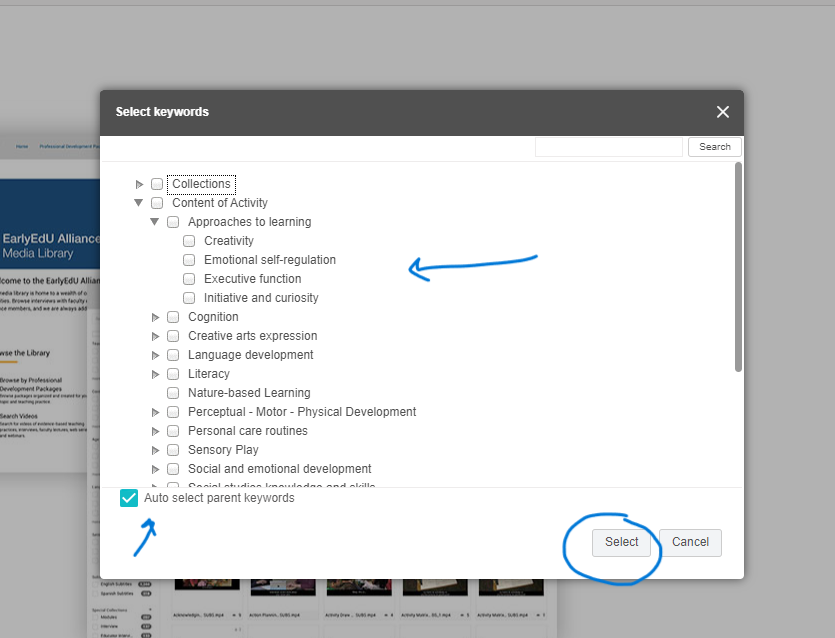
Use the drop down to select specific keywords. Refer to the Multilingual Resource Glossary. After selecting the keywords, click on the Select button.
Complete the Metadata Fields
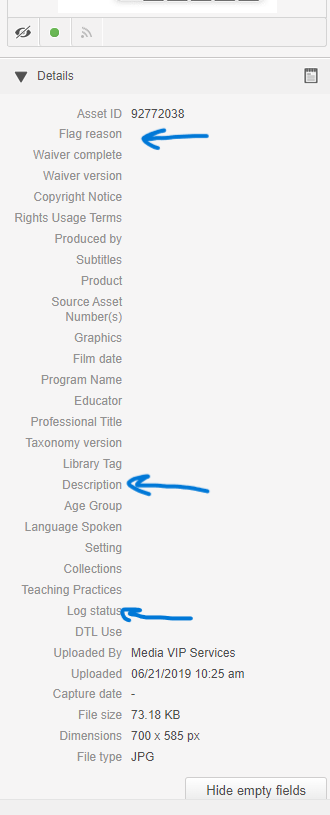
First, open the metadata fields section by selecting “View Fields” at the bottom of the metadata section.
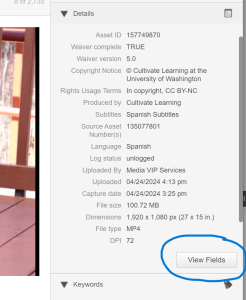
Refer to the Multimedia Resource Glossary, if needed. When you are finished adding iformation the the fields identified below, be sure to save your work by selecting the small check mark next to the open field.
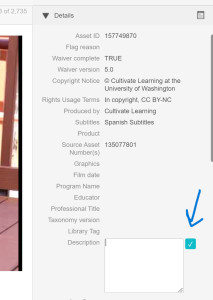
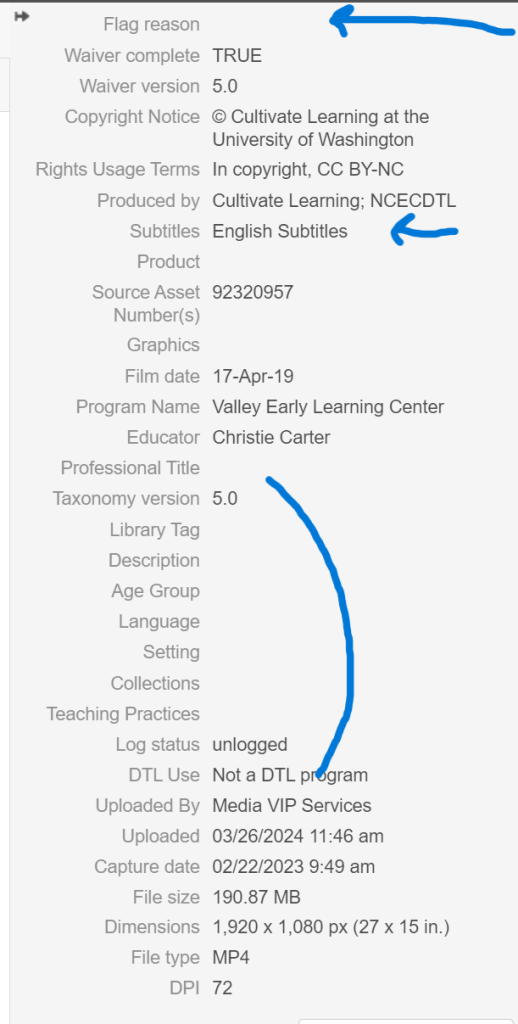
Add information to the following:
- Flag Reason: Review the Flagging Assets chapter.
- Subtitles: Use the drop down menu. Typically, we may have videos with English, Somali, and/or Spanish subtitles.
- Taxonomy: Use the drop down menu. For current annotation, indicate the highest number available from the drop down.
- Library Tag: Leave blank, not Applicable.
- Description: Write a brief synopsis of the video’s content.
- Refer to the Description Template section.
- For videos longer than 3 minutes and/or containing significant shifts in content include timestamps.
- Descriptions should provide enough information that a user will be able to know what the video is about.
- Describe when there are main topic shifts.
- Descriptions should not be a transcript. See Annotating Transcripts section.
- Refer to the Description Template section.
- Language: Use the drop down menu.
- Setting: Use the drop down menu, if applicable. This may be indicated if there is b-roll or classroom footage overlayed with the interview. It might also be indicated if the setting seen in the interview or content discussed specifically references a type of setting.
- Collections: Use the drop down menu. Choose Interview and Educator interview or Faculty interview, if appropriate.
- Teaching Practices: Use the drop down menu. Only add practices if they are evident in the video. Do not add if the interviewee is only discussing a practice. (That information will be in the description, instead). You might see teaching practices when a produced interview has had b-roll or classroom footage overlayed while the person is speaking.
- Log Status: Change status to coded.
- Note: If you are in the training phase as an annotator, you will change log status to “logged” so that it can be reviewed as part of your onoarding. Once this phase ends, you will change log status to “coded.”
Description Templates
The description field describes what is happening in the video. Describe length of video, who is in the video, when and where the action is, and how the content or teaching practice is most visible. Use these description templates to support your work.
Directions
- Indicate video is an interview. Include any demographics indicated in the interview.
- Describe the topic of the interview and what the participant discusses. Use time stamps for shifts in content.
- Interviews may have a transcript. See the Annotating Transcripts section below.
- Examples:
- A 12-minute interview with parent Suzie Friend who has 2 children in Head Start. Suzie discusses how educators made her feel welcome and encouraged her to bring her family culture into the classroom. 05:12 Suzie discusses how the program supported her and her family through the referral process. 10:11 Suzie appreciates the classroom educators.
- A 22-minute interview with Johnny Friend, Director at We Are Friends Preschool Program. Johnny discusses how data informs practice in the program. 06:12 Johnny discusses difficulty in staff retention. 12:52 Johnny shares the program’s Early Achiever process and ways participating in the process improved teaching practices. 15:01 Johnny shares curriculums used by educators including Conscious Discipline and Creative Curriculum. The educators also implement GLAD strategies as part of their dual language support.
Annotating Transcripts
Some videos will have an AI generated transcript to help users easily read through the content of that video. This is also an important tool to ensure accessibility. The transcript is saved in Webdam as either a PDF or a TXT document. The title indicates which video it reflects.
Directions:
- Relate the transcript and the video.
- Complete the metadata fields:
-
- Flag reason: Add “Internal content development use only, AI generated.”
- Description: Add “Transcript for asset ID # xx” (Replace xx with specific asset ID #)
- Log Status: Change status to coded.
